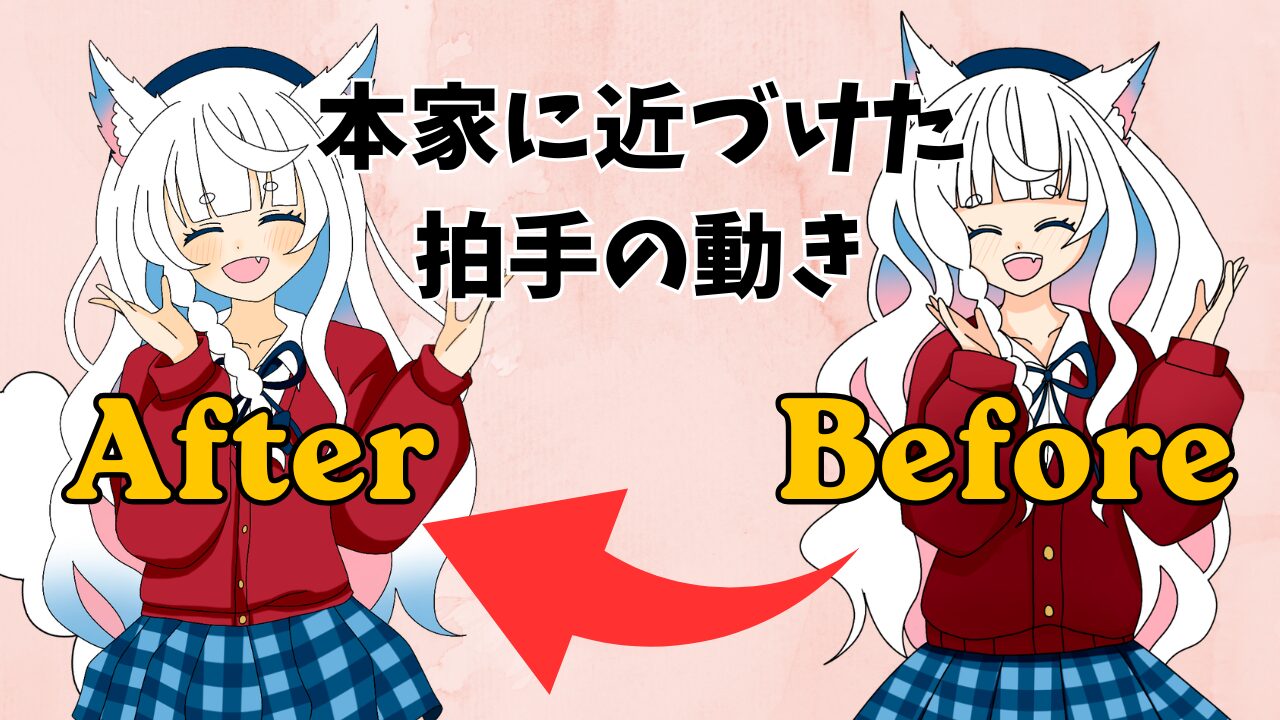
[Heart Forecast ③] The clapping motion in a maid outfit! A record of the weight of the fabric and fine-tuning.
Pochi
Reading in the sun and reading in the rain.
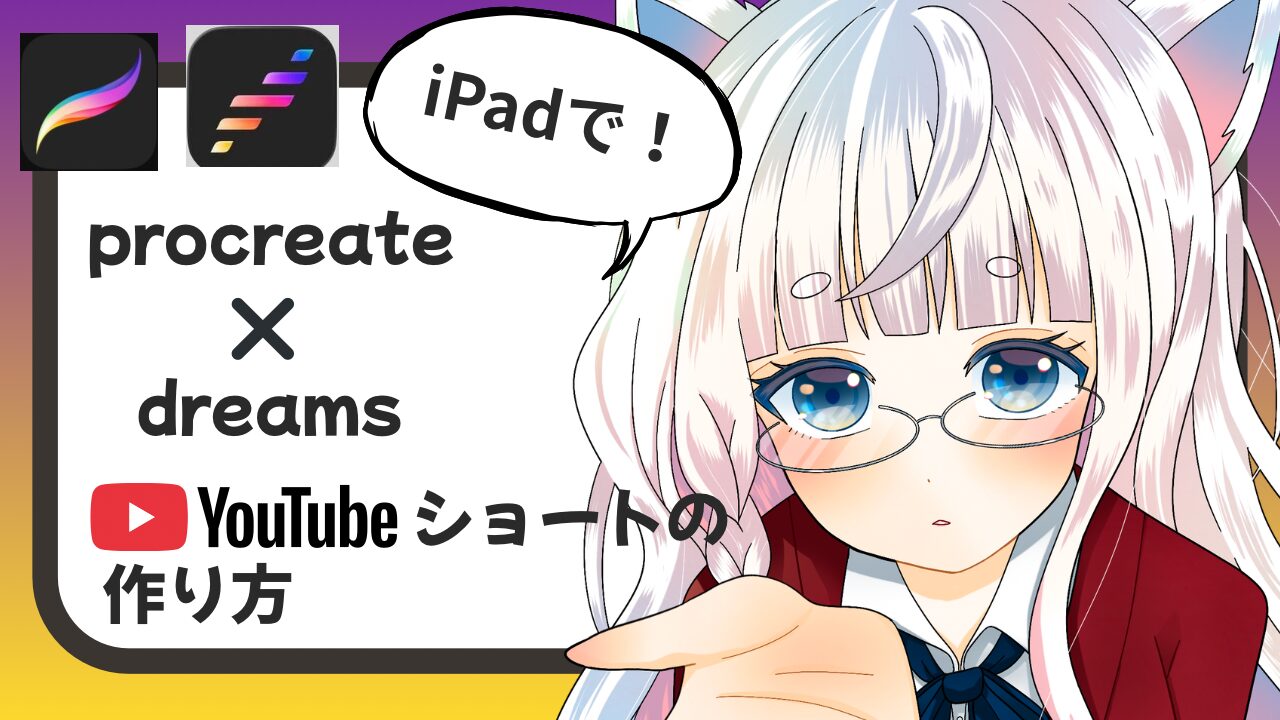
"I like drawing, but video editing seems difficult..." I would especially like anyone who feels that way to read this.
actually,With an iPad and two apps (Procreate and Procreate Dreams), even beginners can easily create short videos.。
In this article, I will explain what I actually doSteps for editing videos for YouTube ShortsWe will explain it step by step in an easy-to-understand way.
This content is perfect for people who say, "I want to make videos, but I don't know where to start," or "I'm interested in Procreate Dreams, but I don't really know how to use it."
Please feel free to use this as a reference.
 Create short videos easily with Procreate and Dreams! A beginner-friendly guide to making them.
First, let's look at the items you'll need to create a video.
*If you prefer drawing with your finger, you don't need an Apple Pencil!
Procreate Dreams includes:return」「move onThere is no " button".
Therefore, the following gesture controls are very important.
Just remembering these two operations will make your editing process much smoother!
First, create illustrations in Procreate to prepare the materials.
The subject matter is up to you,Content that does not violate the terms of service of platforms such as YouTube.Let's choose this one.
The illustrations I've drawn will become the main subject of the short video I'm going to create.
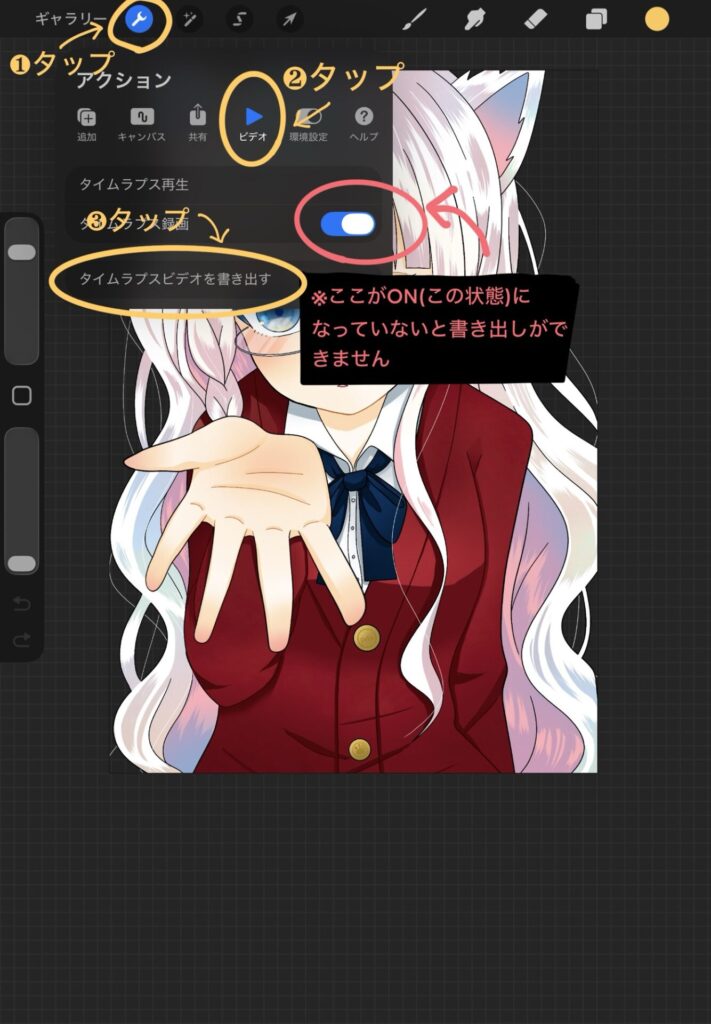
Tap in the order of ❶ to ❸.
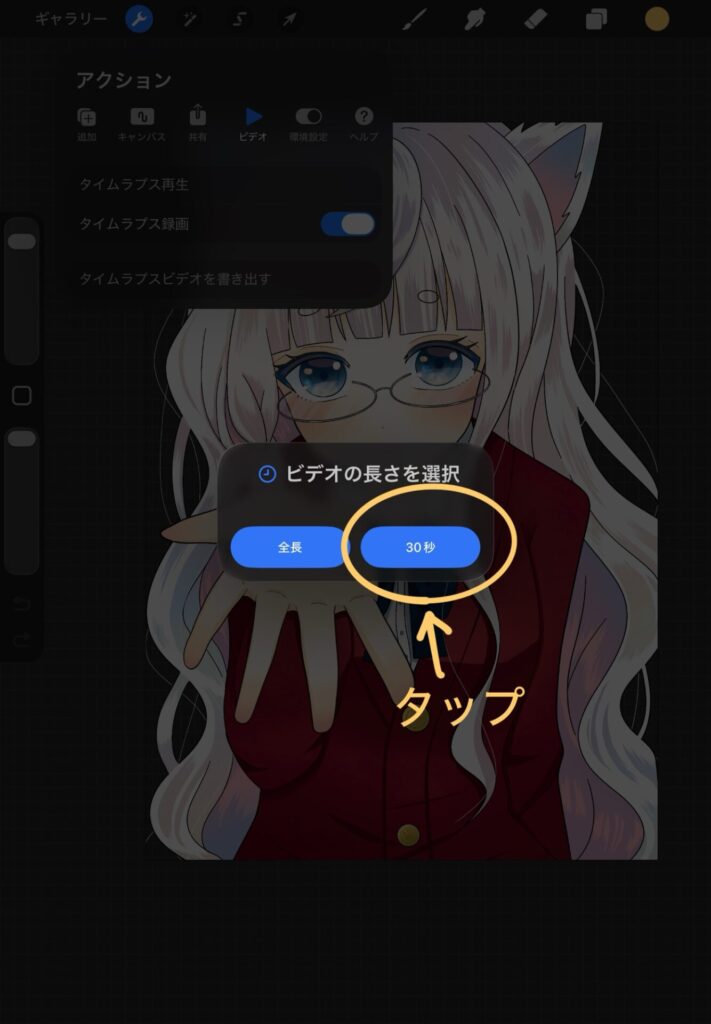
Here you can choose between 30 seconds and the total length.
This time, we'll create a short for YouTube, so we'll select 30 seconds.
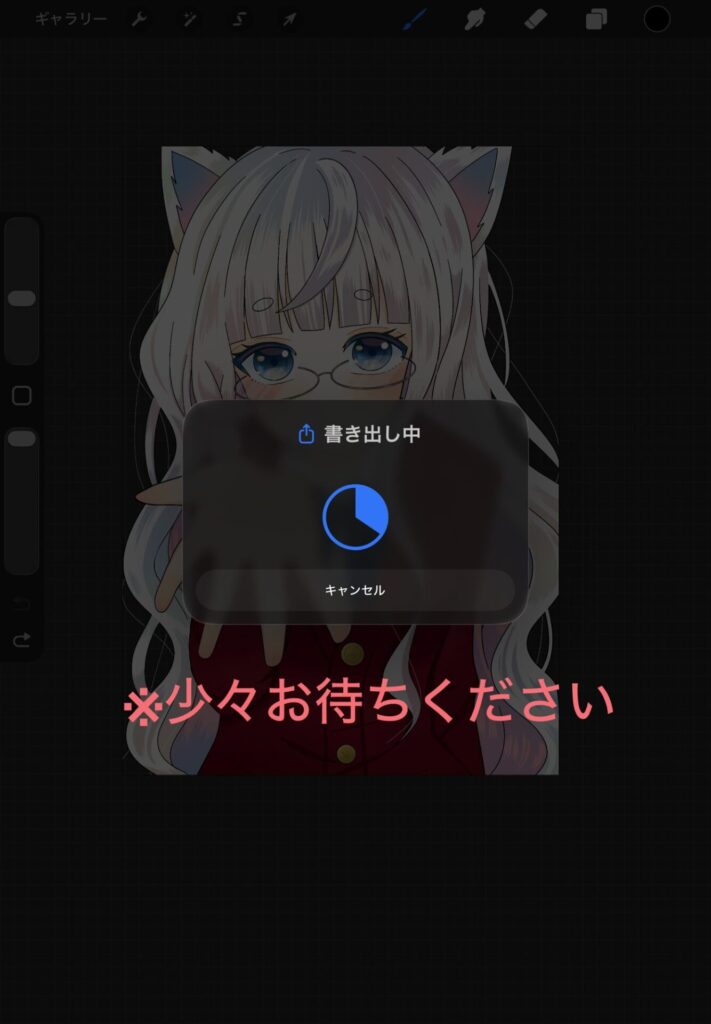
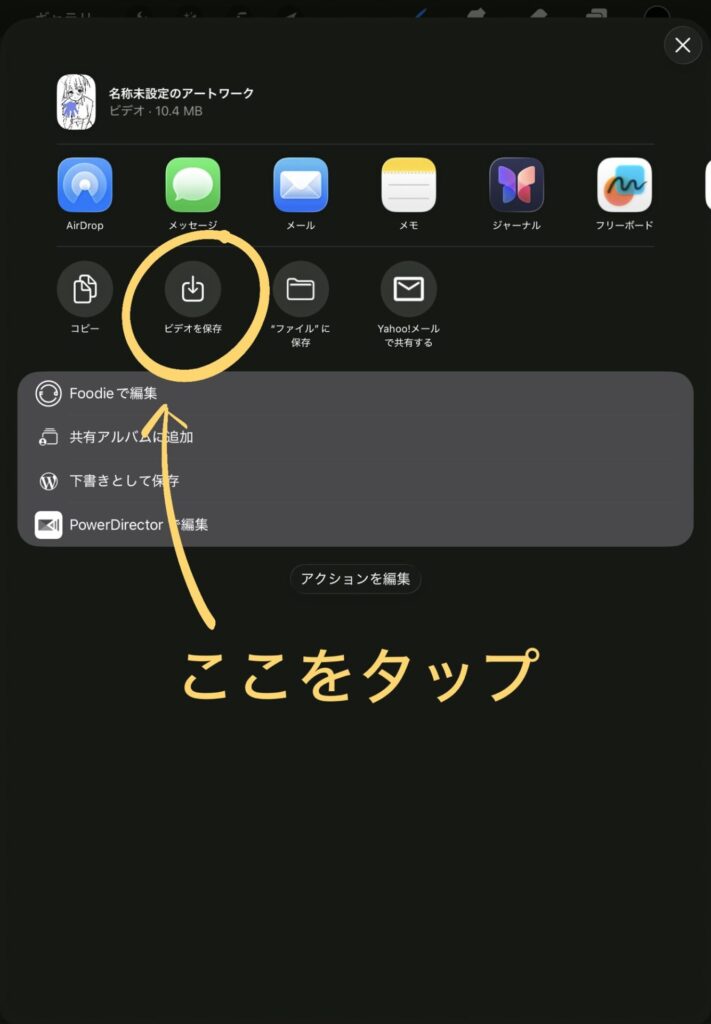
Once this screen appears, save it to the location of your choice.
This time I'll be editing on my iPad."Save video"Tap it.
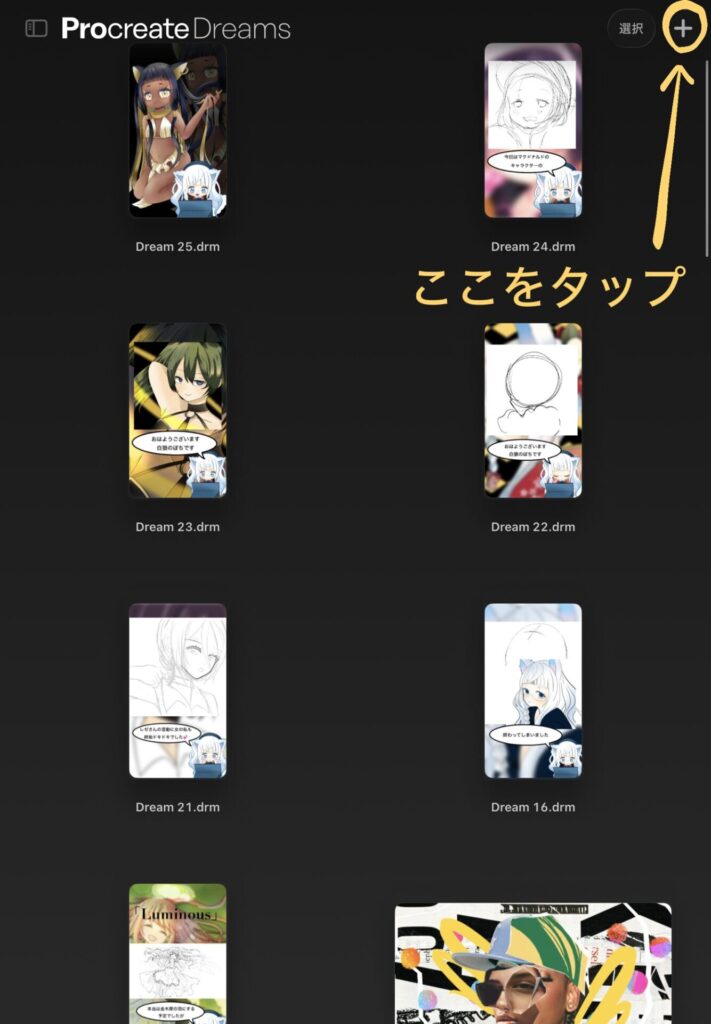
Tap the "+" in the upper right corner.
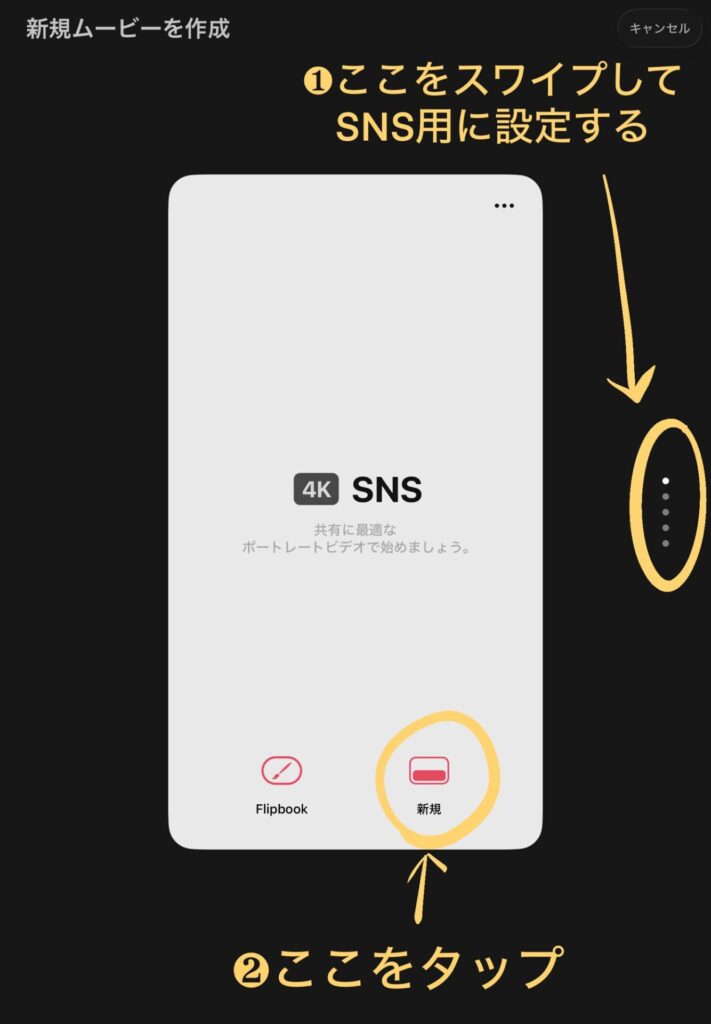
Select the video size.
Since this is for YouTube shorts, I'll choose this option for social media.
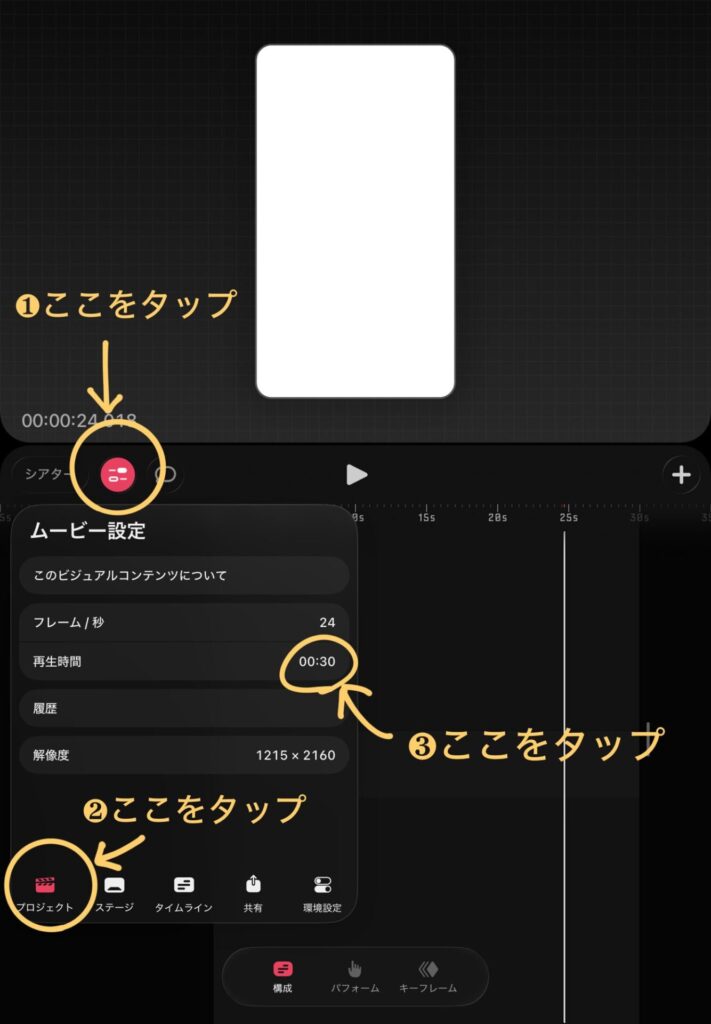
First, I'll change the video length.
Tap in the order of ❶ to ❸.
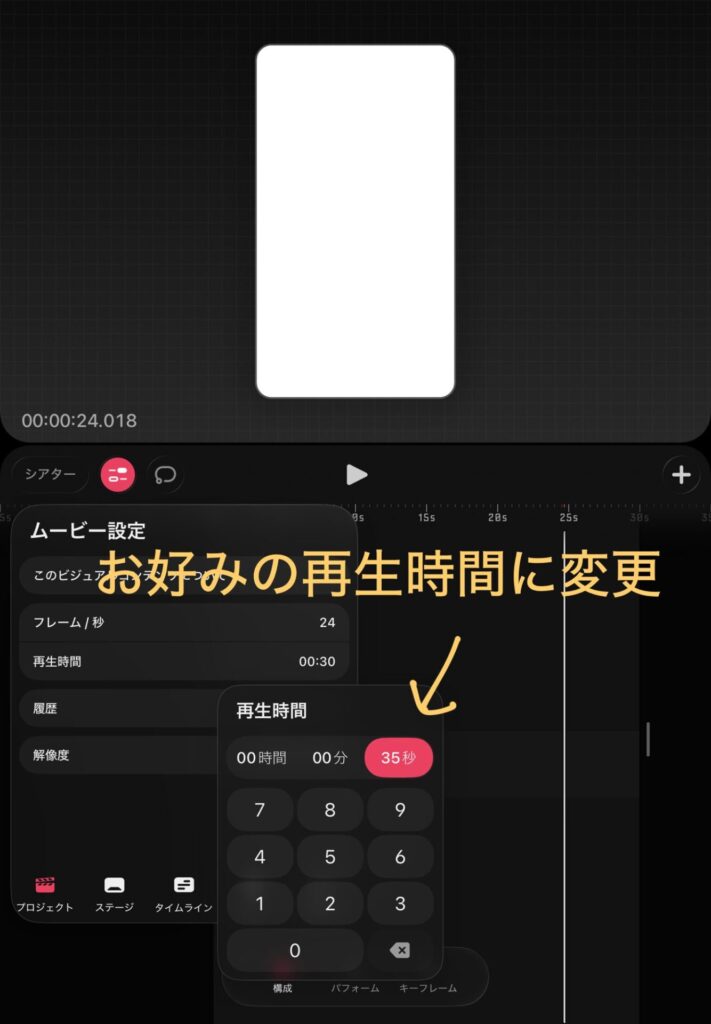
Since the time lapse is 30 seconds, I'll set it to 35 seconds.
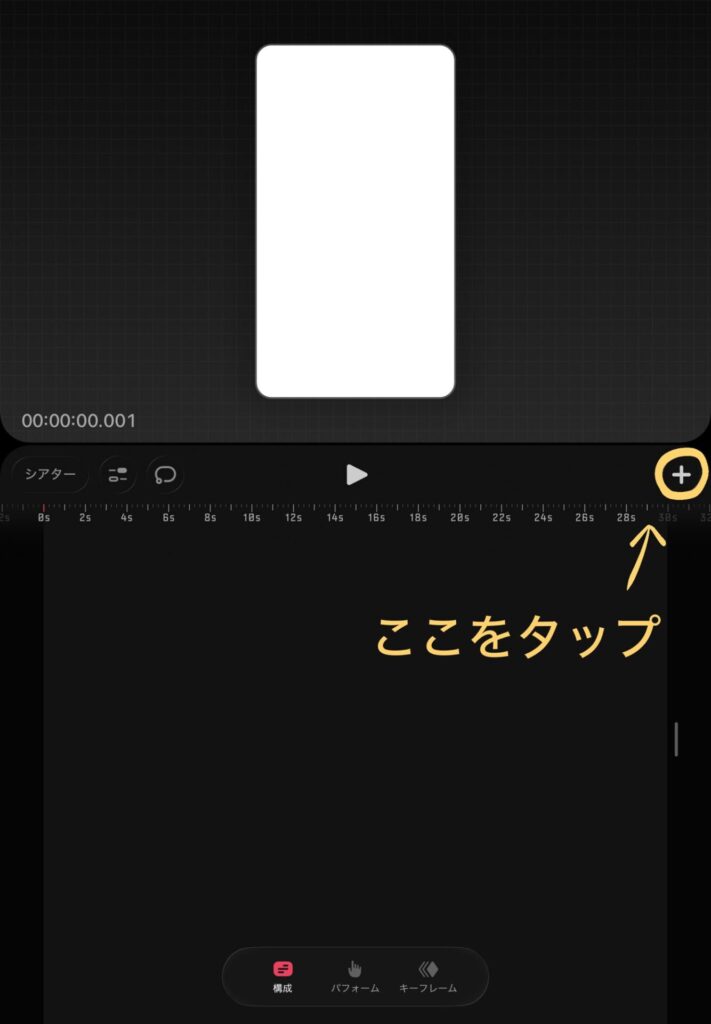
Then, a screen like this will appear, so tap the "+" button.
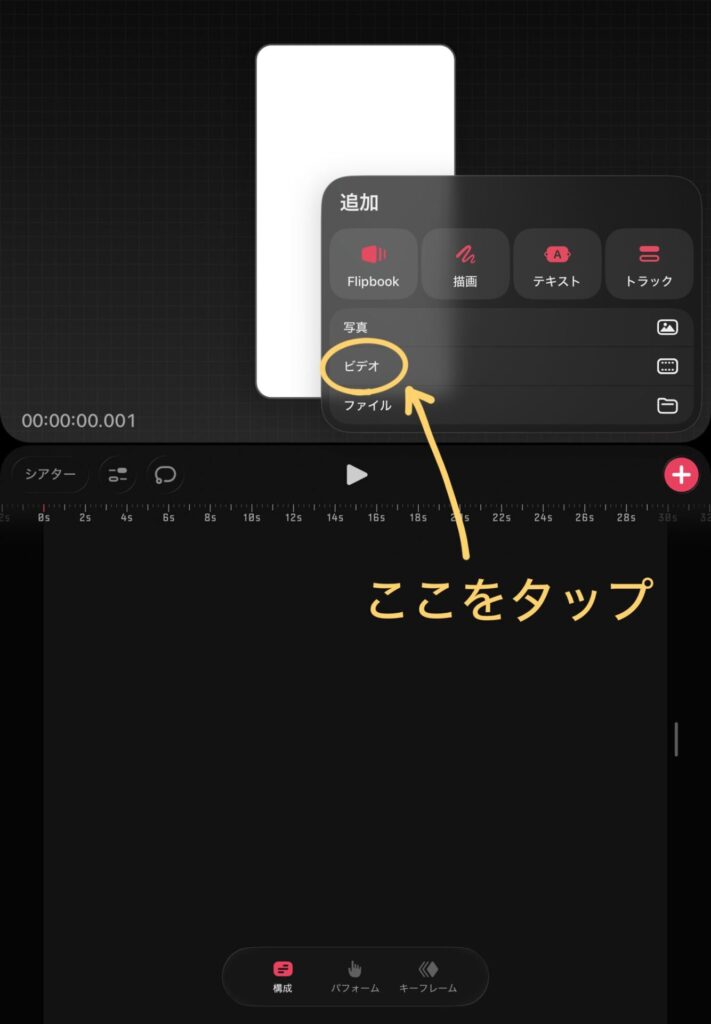
An additional screen will appear, so tap on the video.
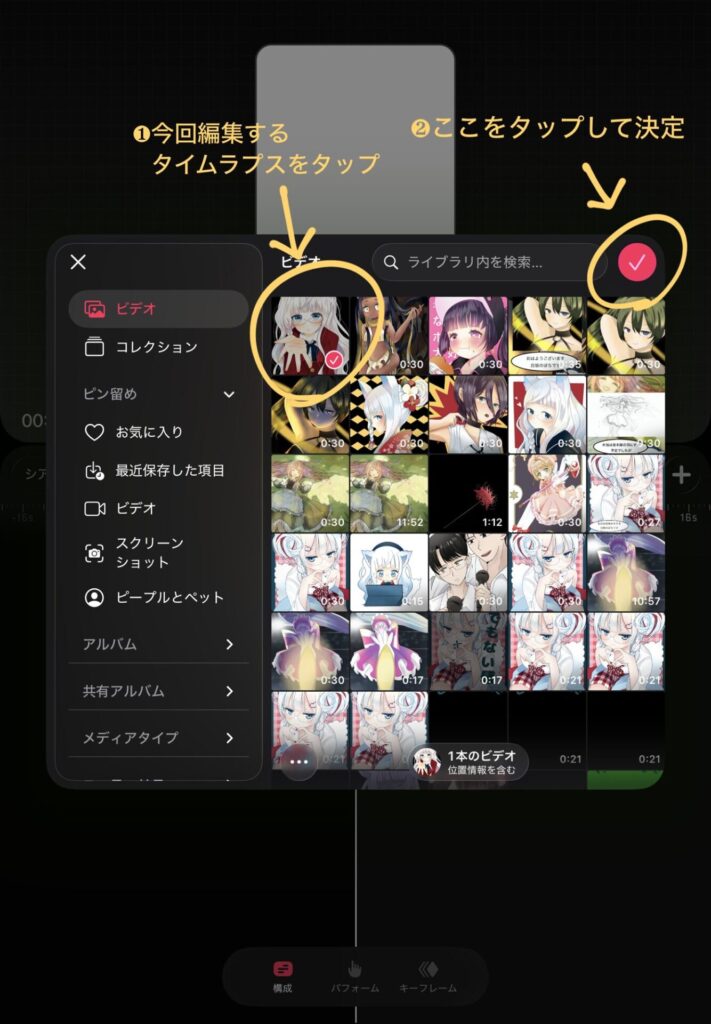
Select the video you want to edit.
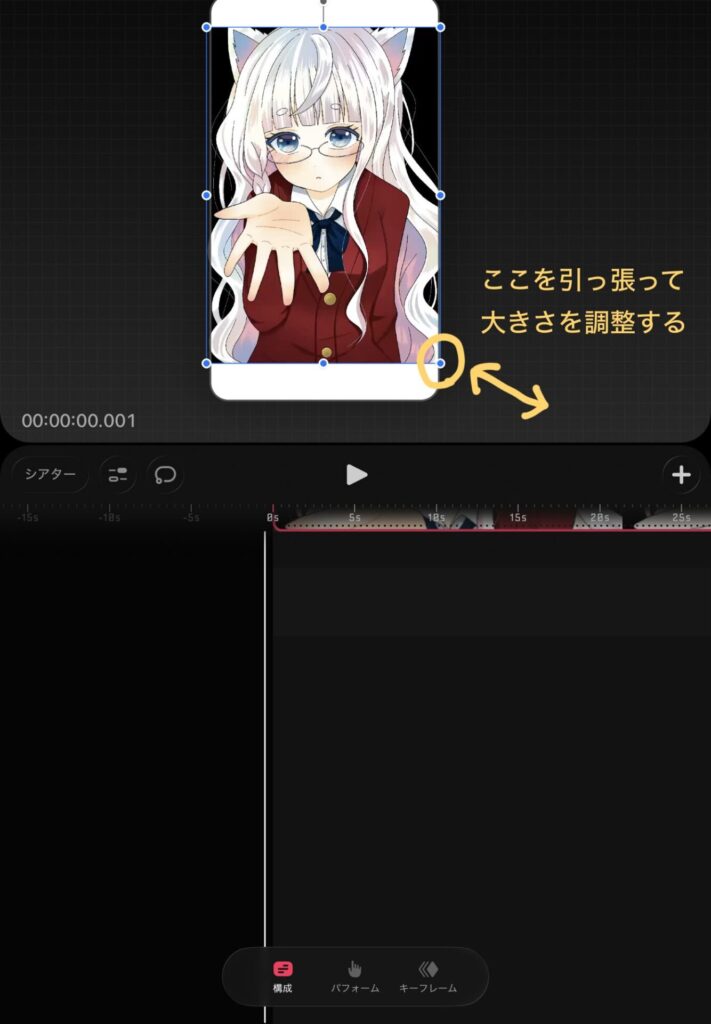
The size doesn't match the stage, so swipe the blue circle in the bottom right to adjust the size.
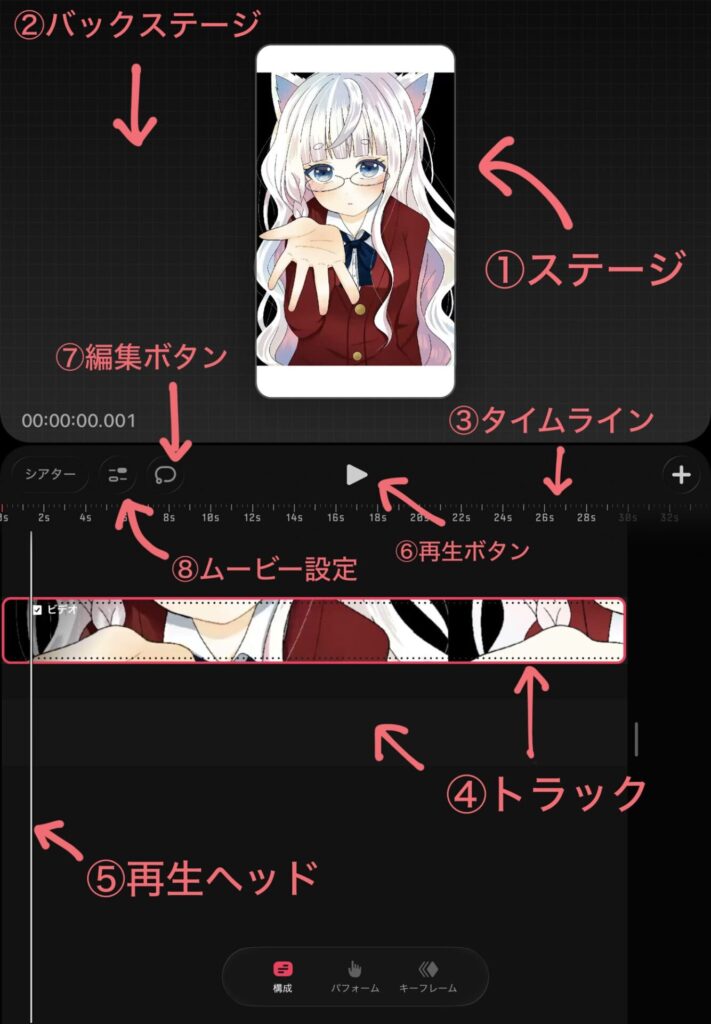
I don't use the terminology very often, so I've attached an image with the names written on it.
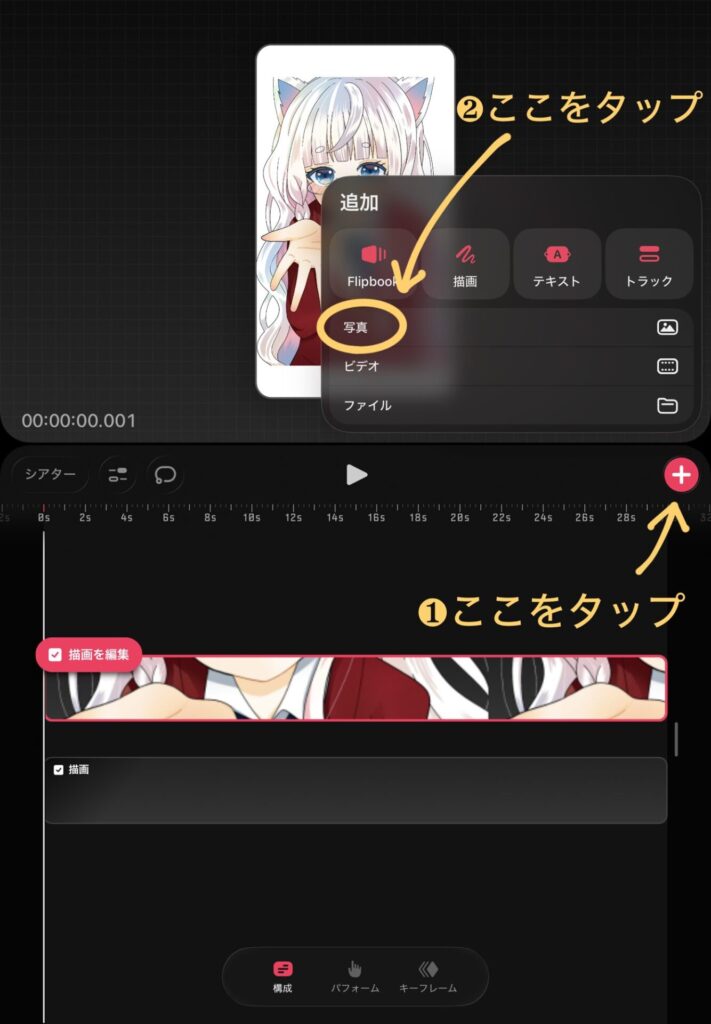
Next, we'll insert a photo for the background.
Tap the "+" button, just like when you insert a video, and select "Photos".
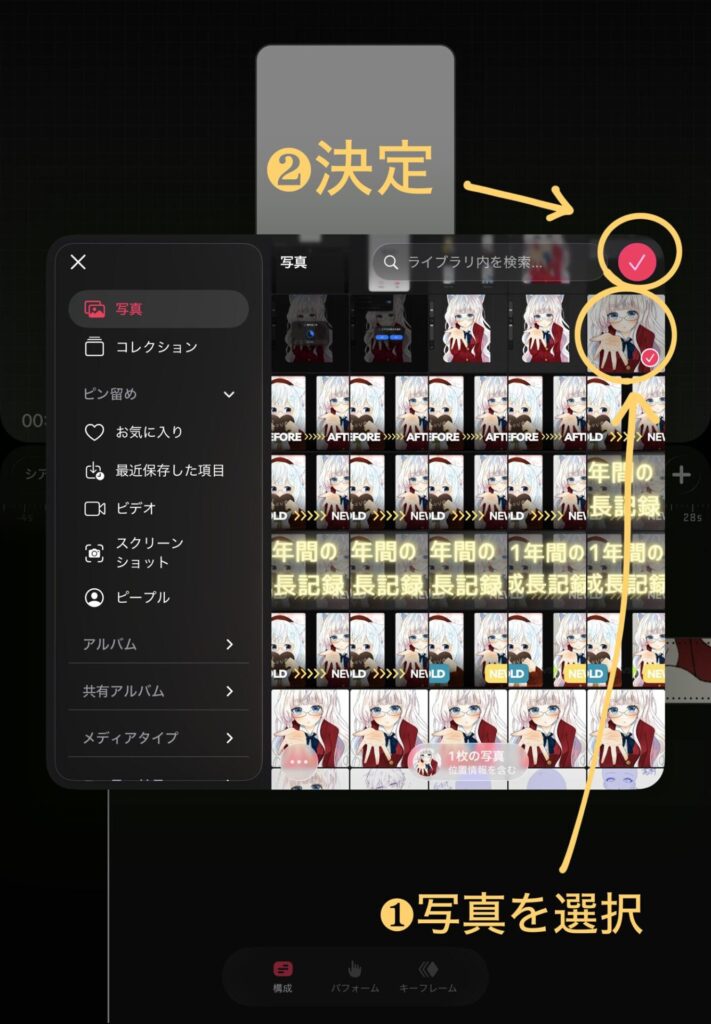
Select the image you want to insert as the background.
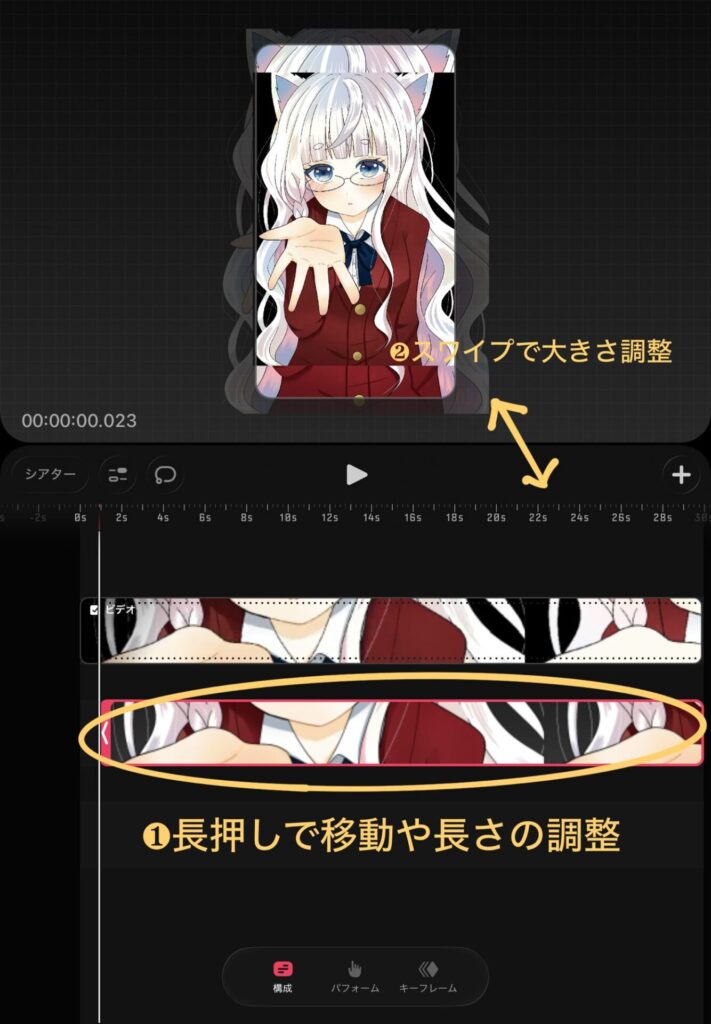
Move the image you just inserted to the bottom of the track (layer).
(If this is not possible, insert a new track.)
You can adjust the length of the video displayed by moving the red arrow on the right side of the track.
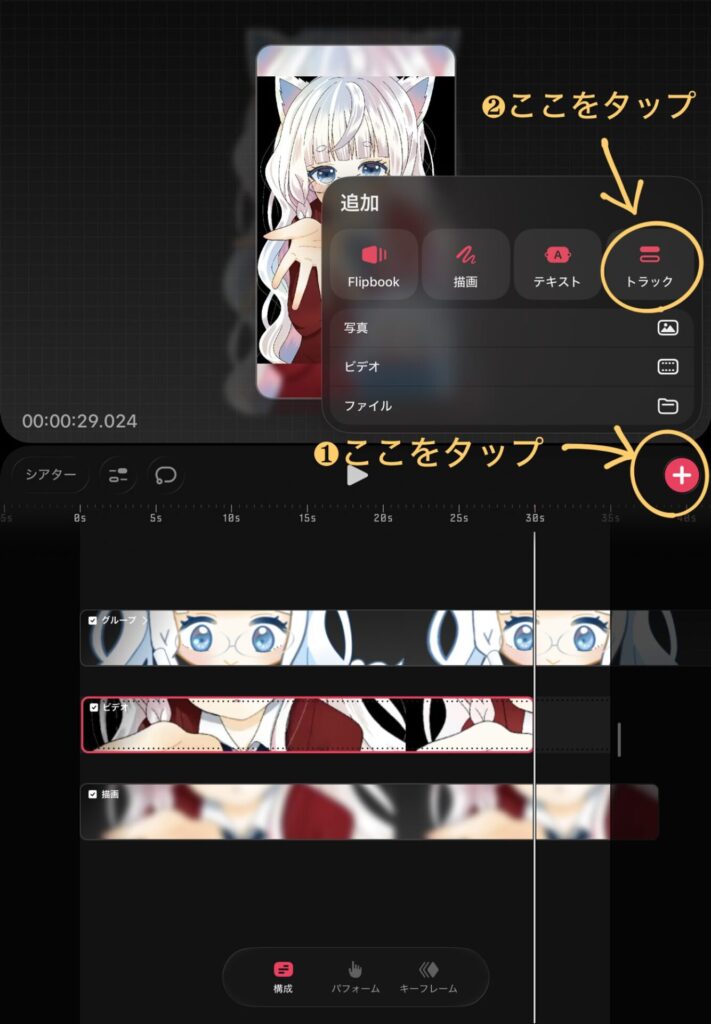
You can add a new track by tapping "+" and then pressing "Track".
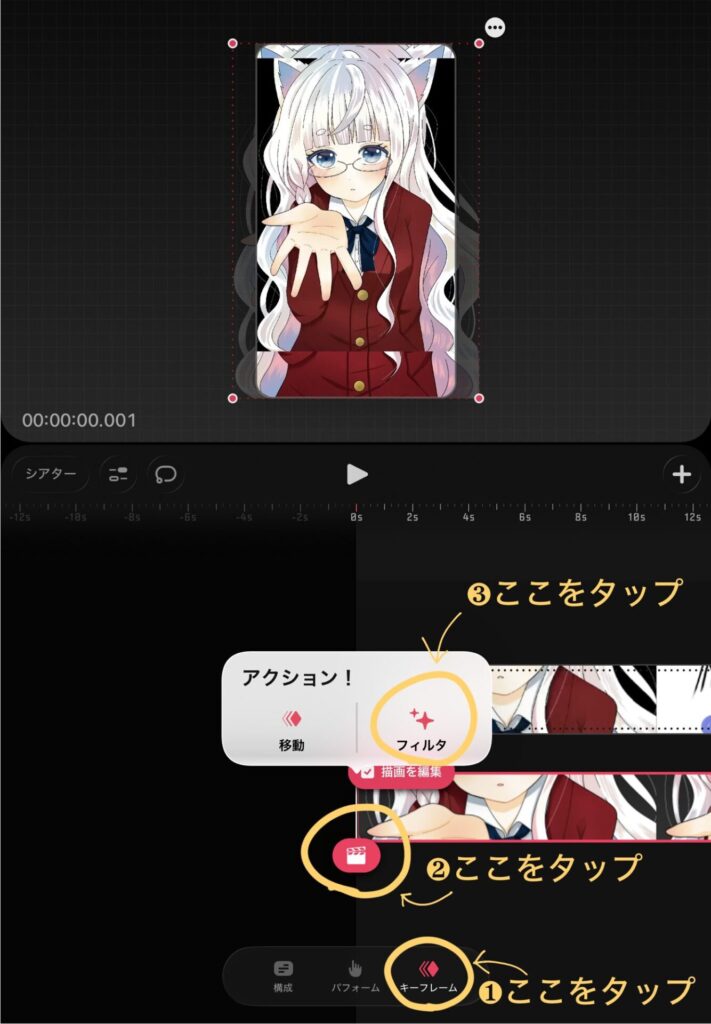
Tap in the order of ❶ to ❸.
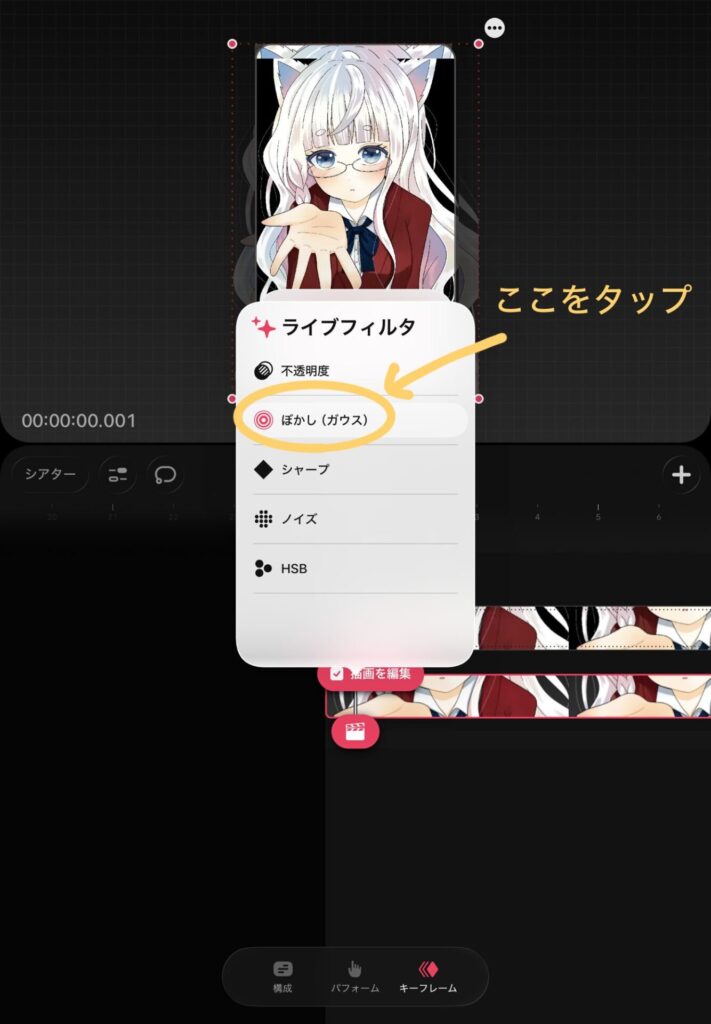
Tap "Gaussian Blur" in the Live Filters.
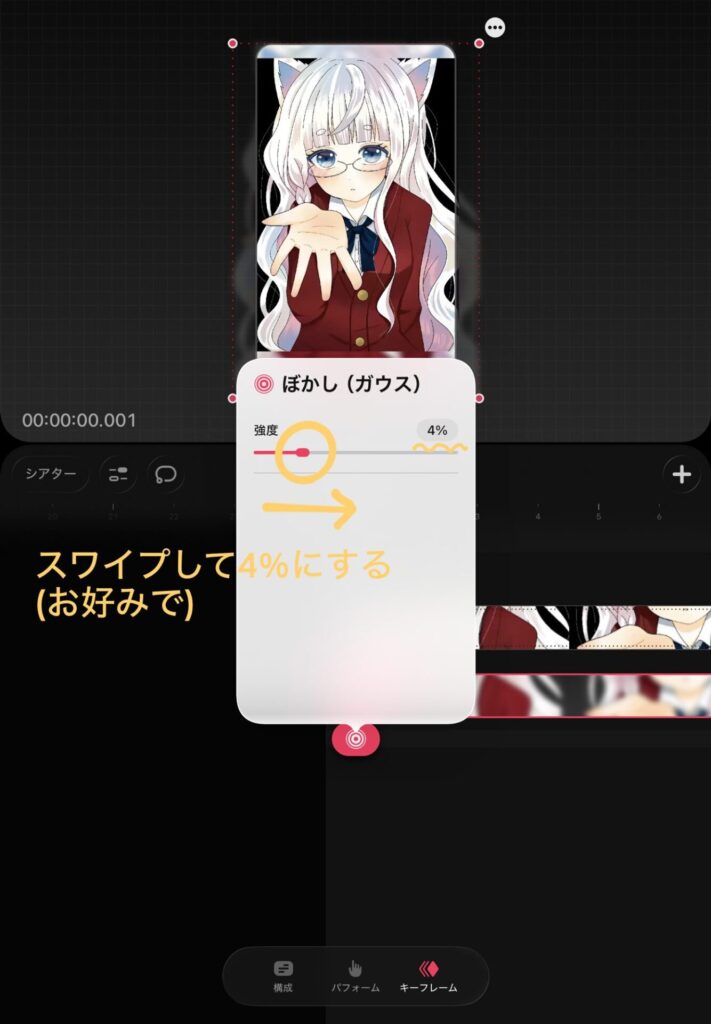
Sliding the blur intensity slider to the right will increase the blur effect.
You can blur it to your liking.
This time, I set it to 4%.
This allowed me to blur the image.
(Using a blurred image from the start is also an option.)
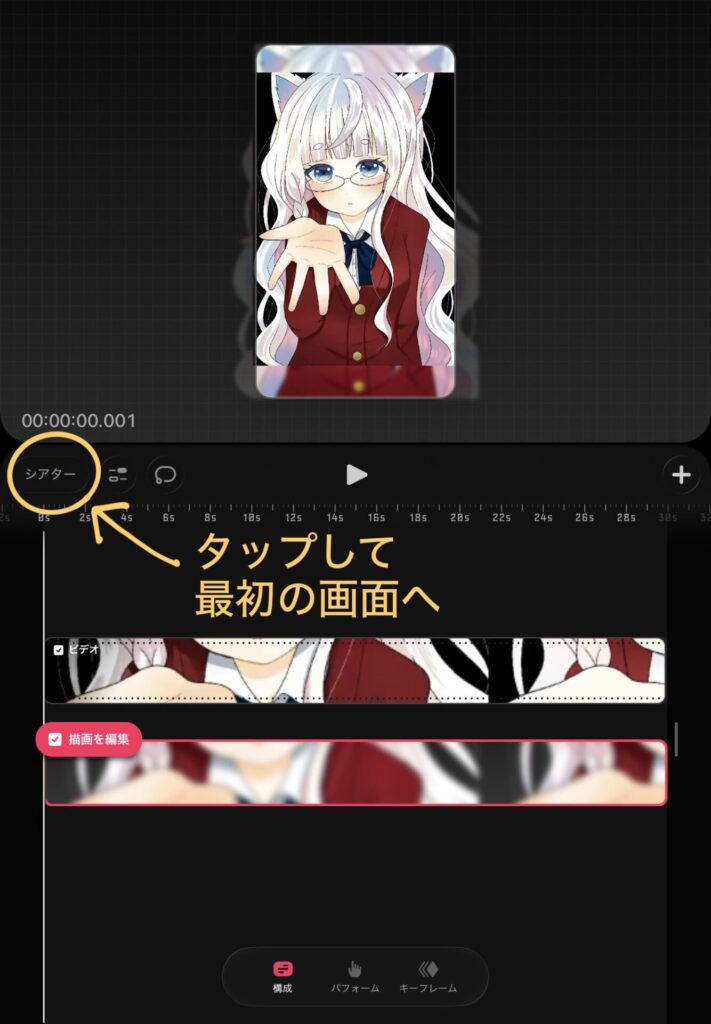
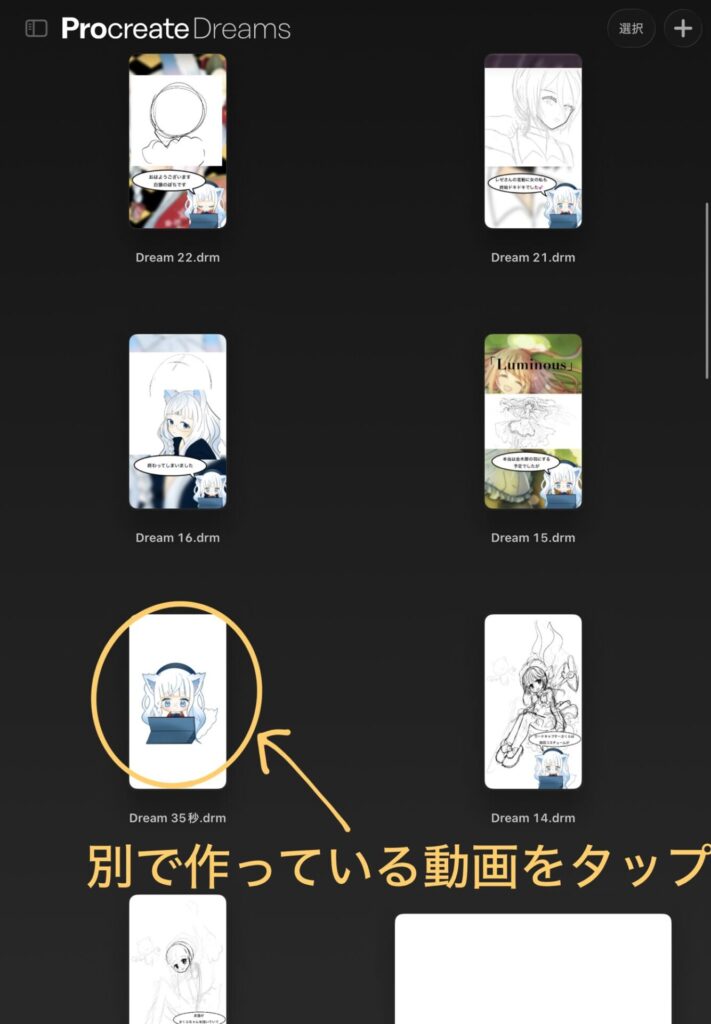
Select the pre-made 35-second animation.
(I will explain how to create this animation at a later date.)
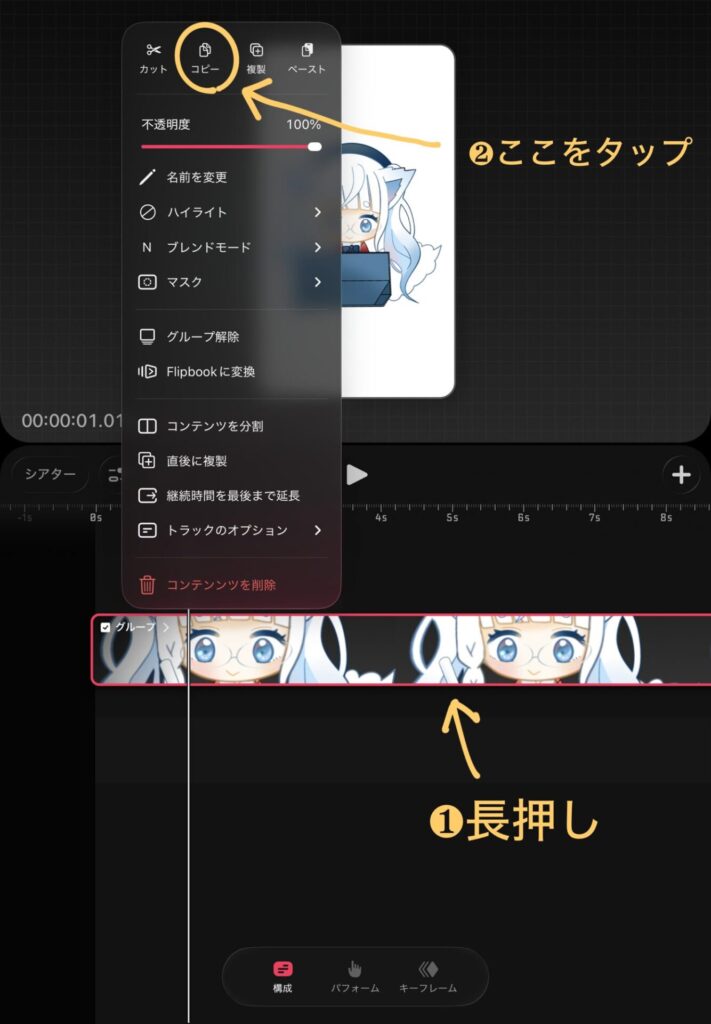
Press and hold the animation track, then tap "Copy".
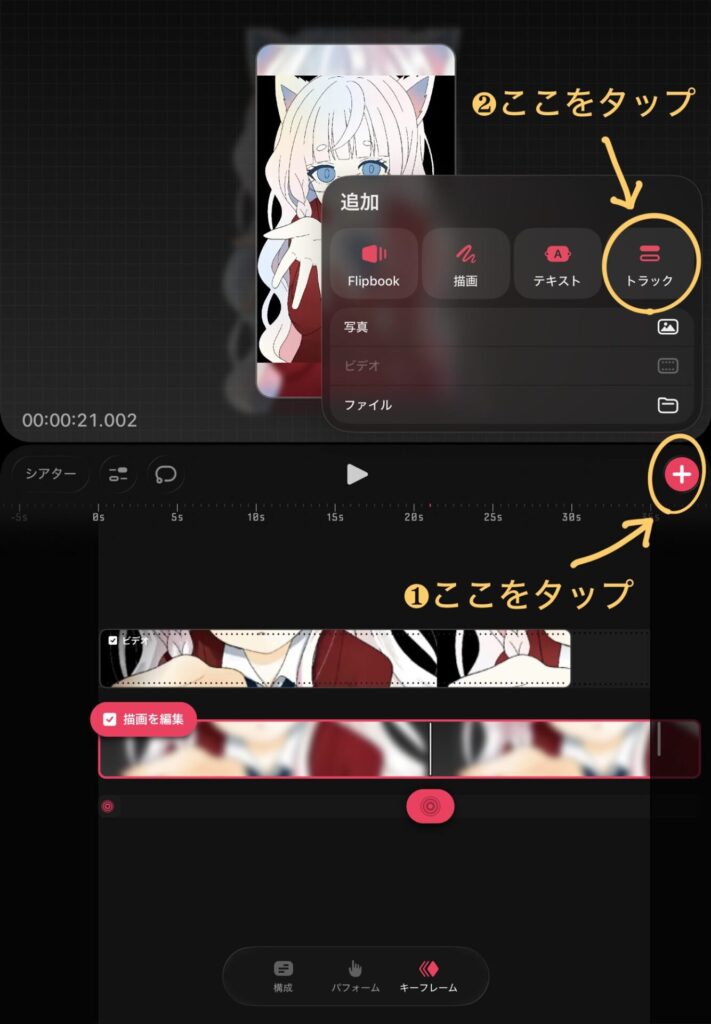
Go back to where you left off in the video you were initially creating, tap "+", and select "Track".
Add a new track.
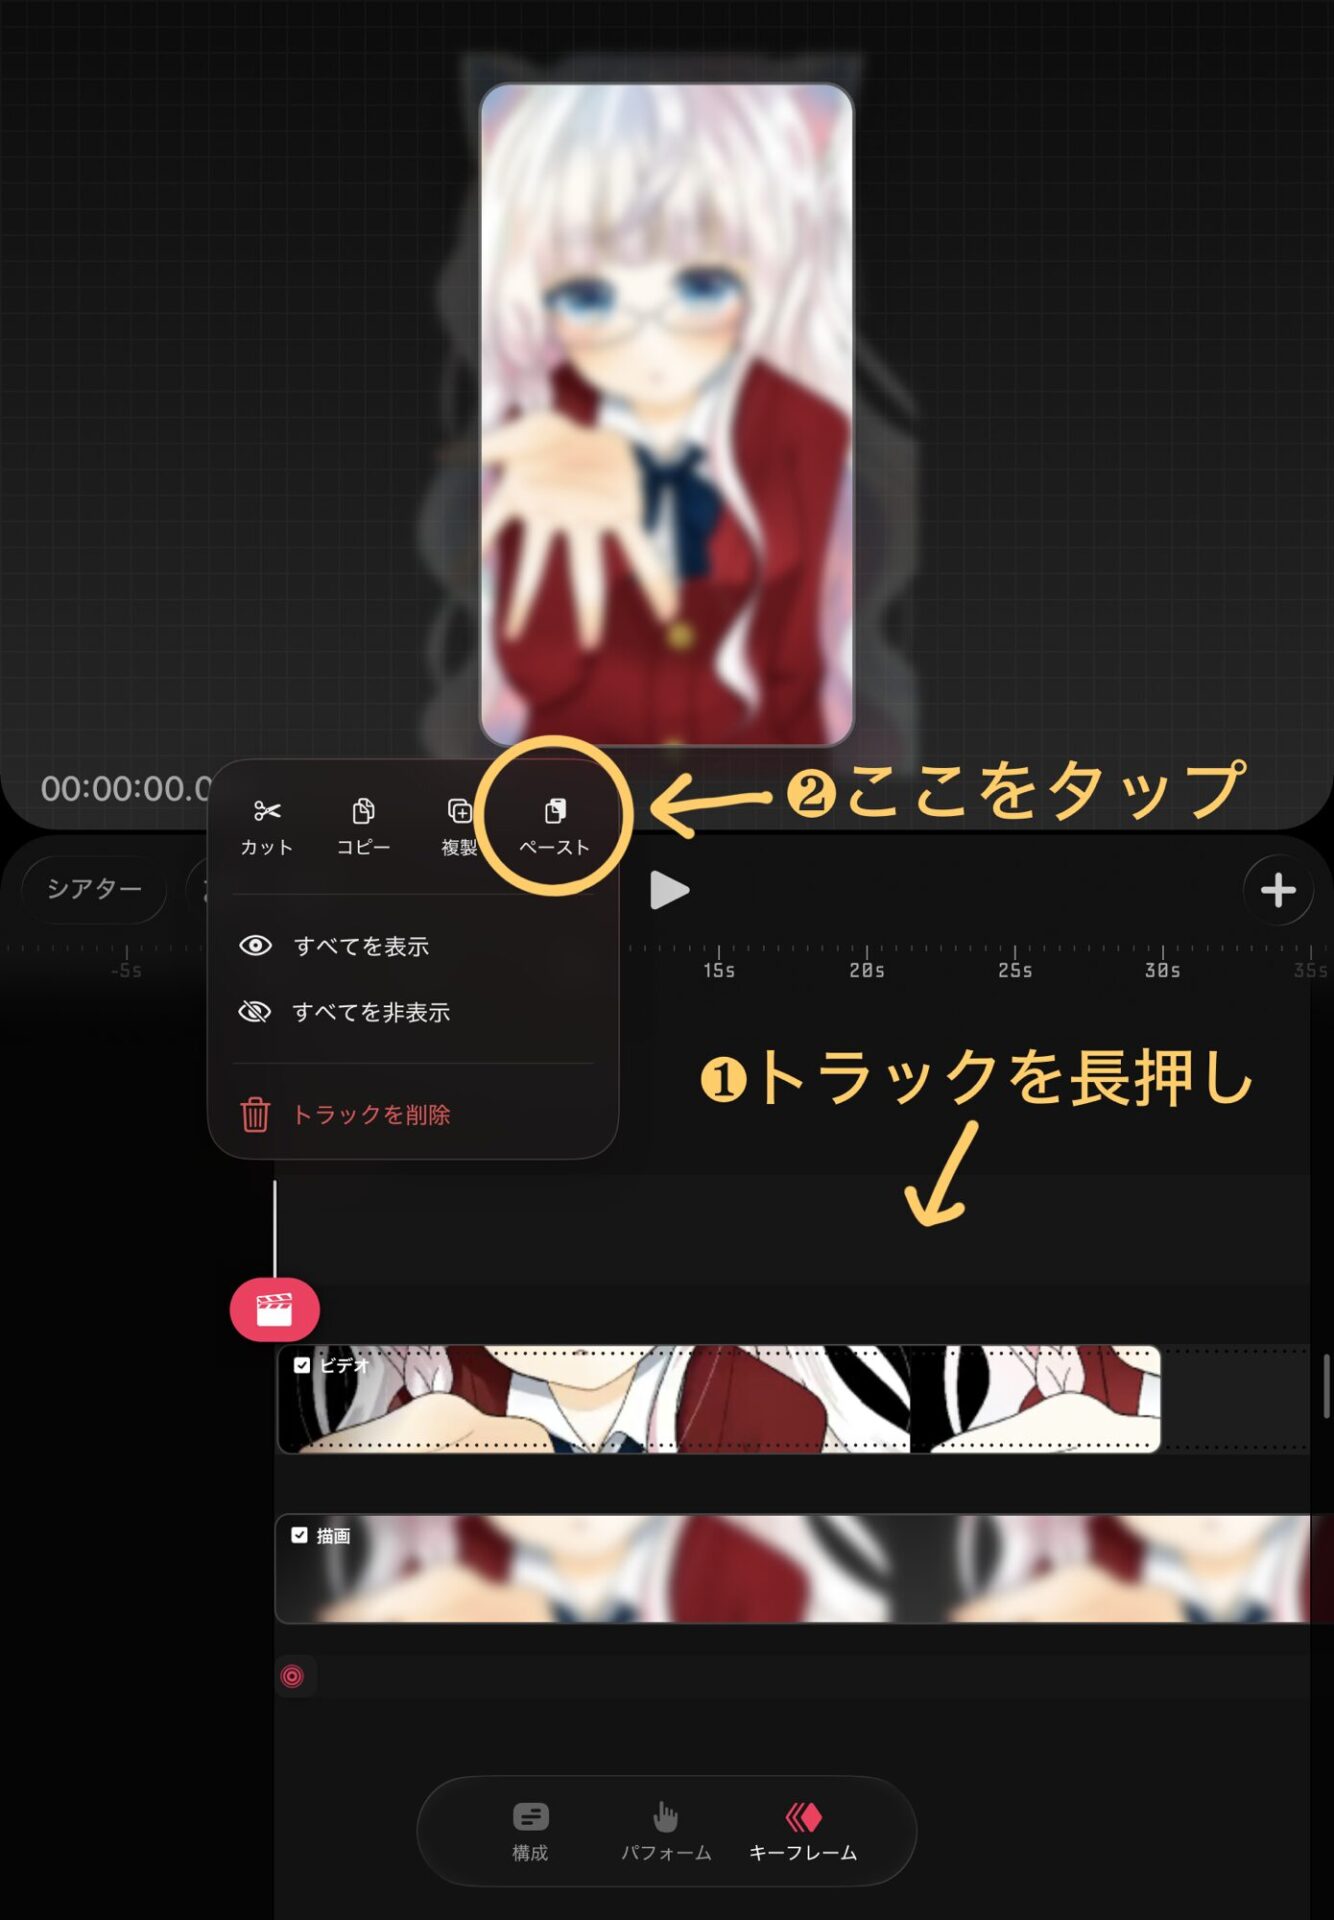
Press and hold the newly created track, then tap "Paste".
Now you can add the animation we just discussed.
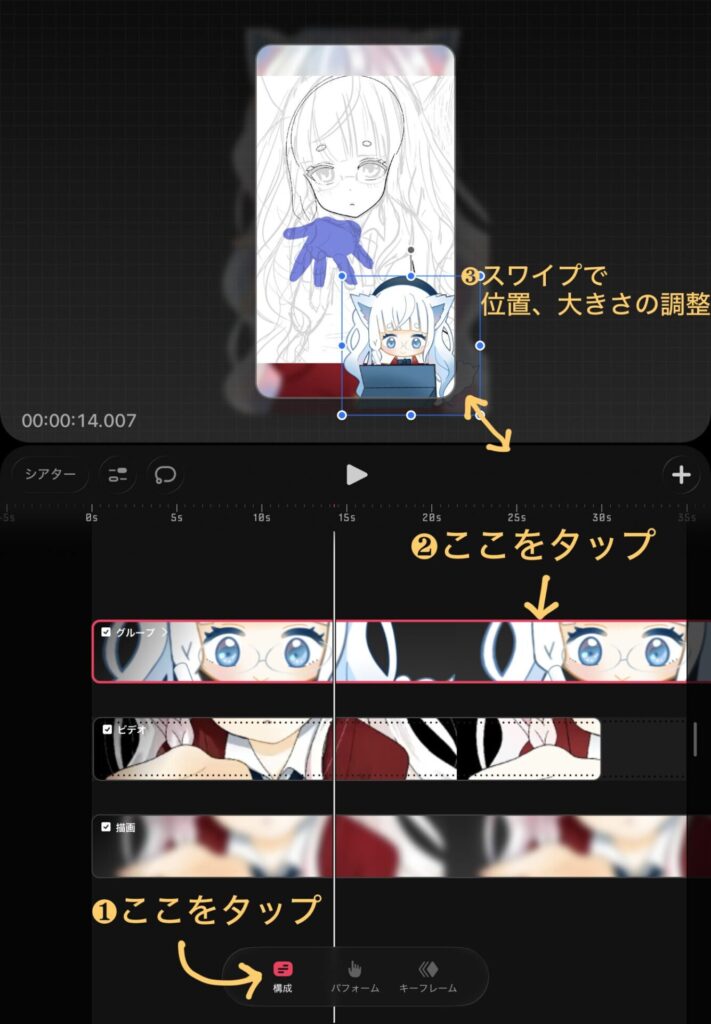
Adjust the position and size of the animation in the order of ❶ to ❸.
Add a new track.
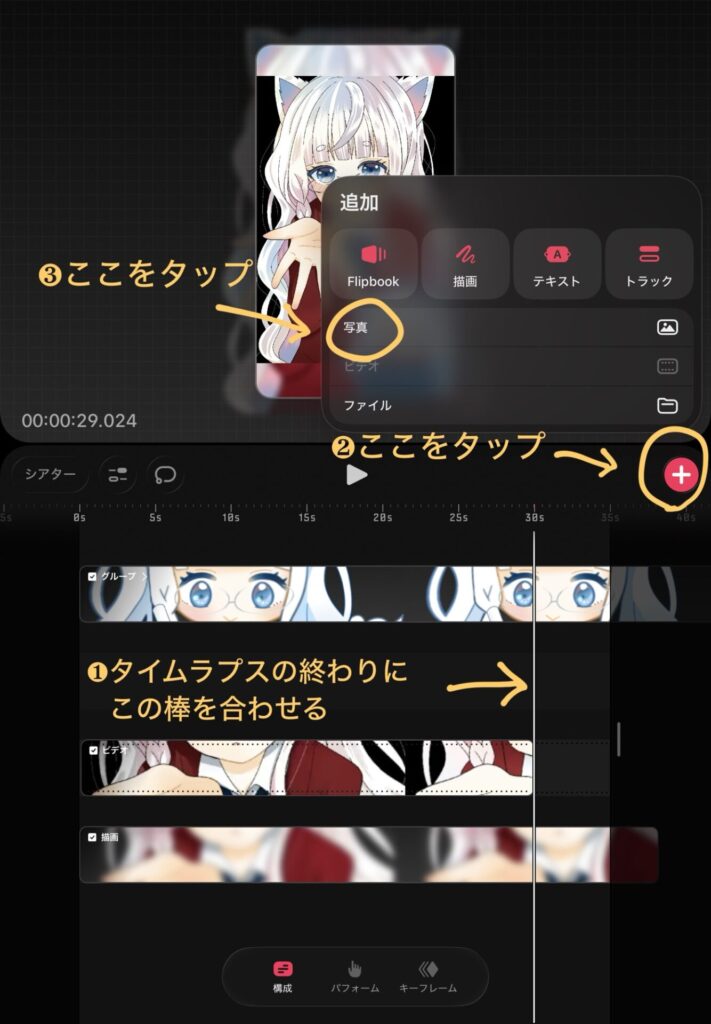
Align the playback head (rod) ❶ with the edge of the time-lapse video.
Then tap in the order of ❷ and ❸.
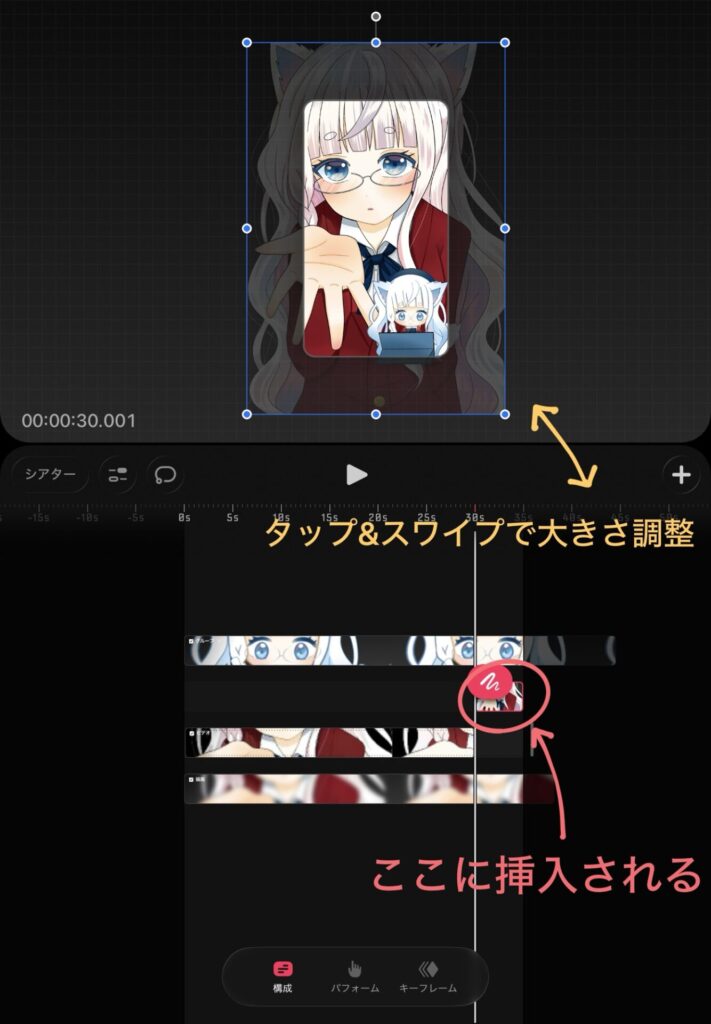
Then, as shown in the picture above, the completed illustration will be inserted to the right from the playback head (rod).
At this point, make the illustration larger than the stage so that it extends beyond it.
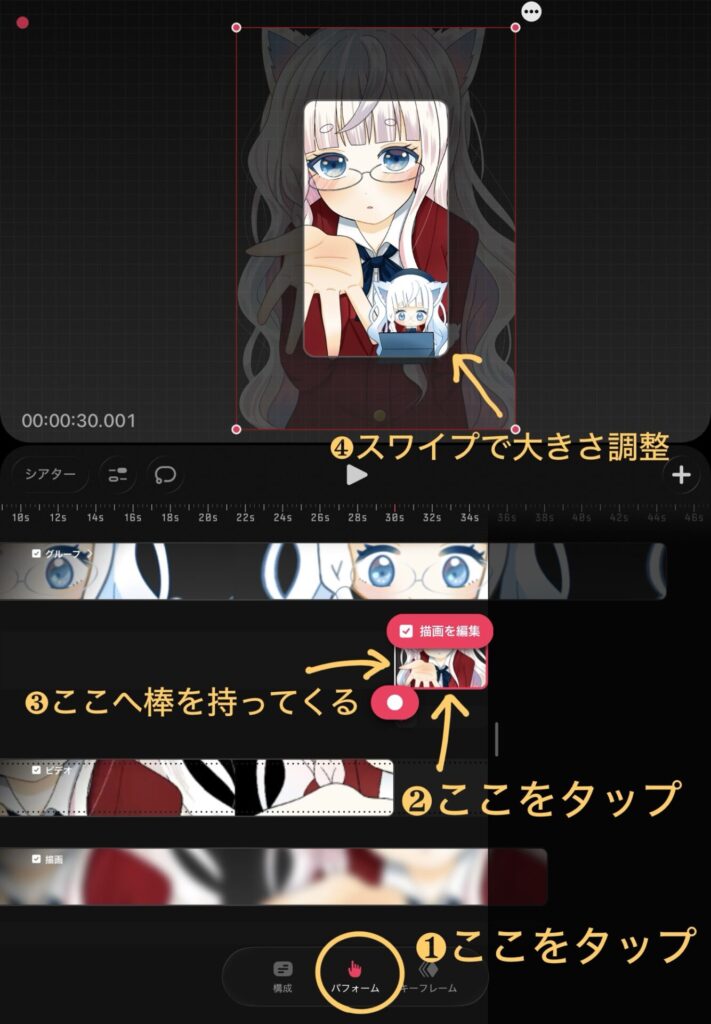
We will proceed with the tasks in order, starting from ①.
This will record the size adjustments as they are.
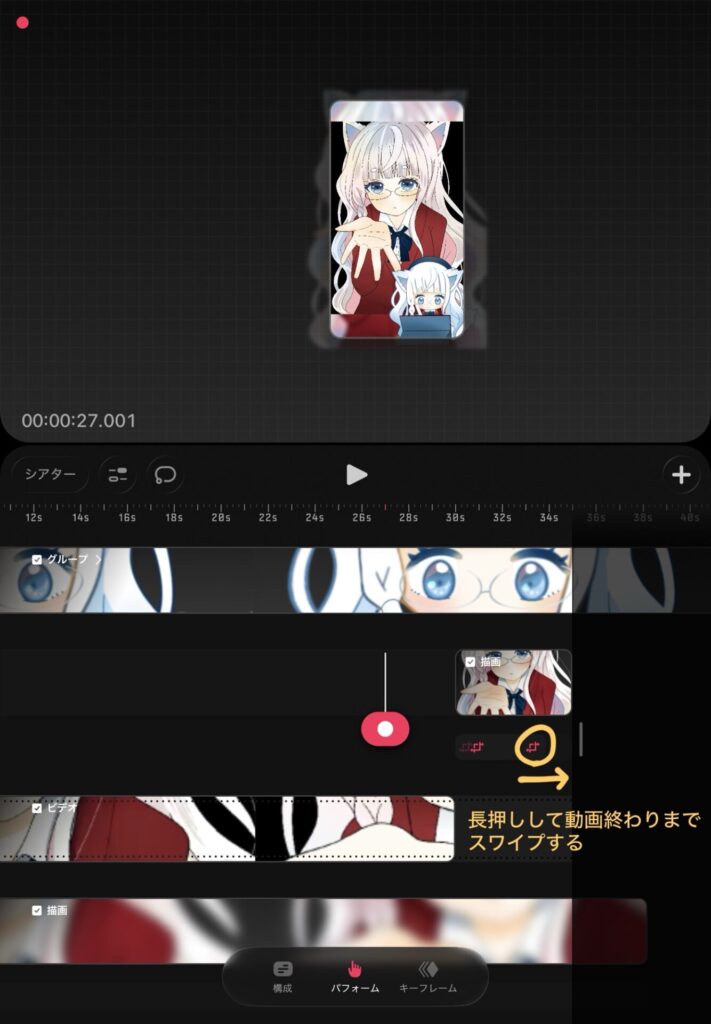
Once you've determined the final size, you can animate it by moving the symbol inside the yellow circle to the end. (This creates an animation where it gets progressively smaller.)
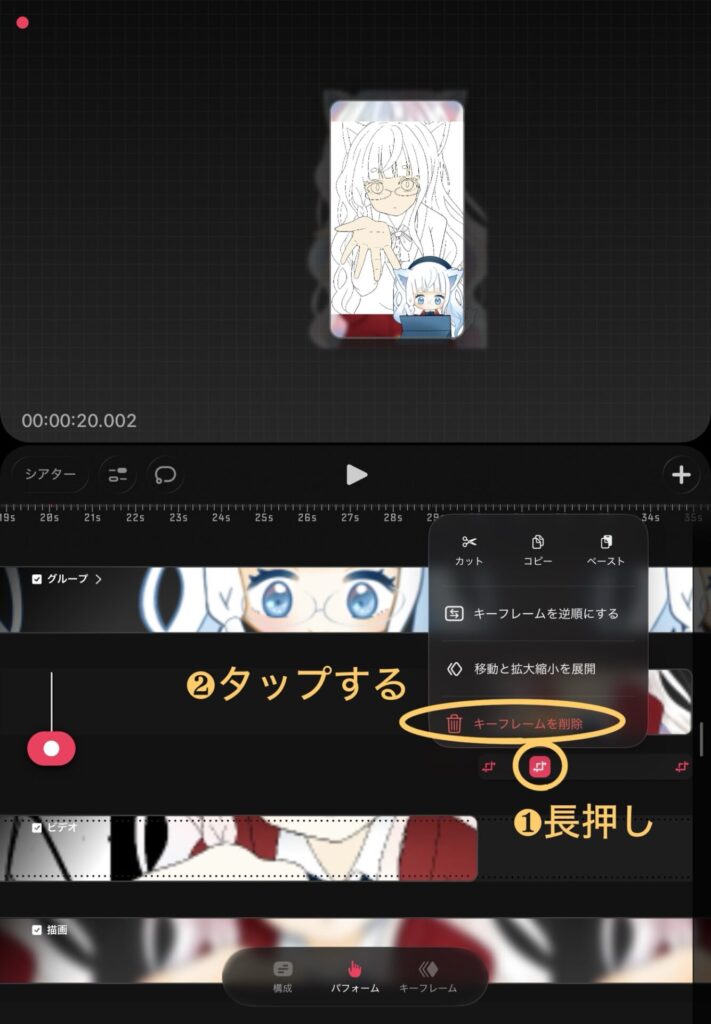
As shown in the picture above, you can delete the parts of the animation that you don't need.
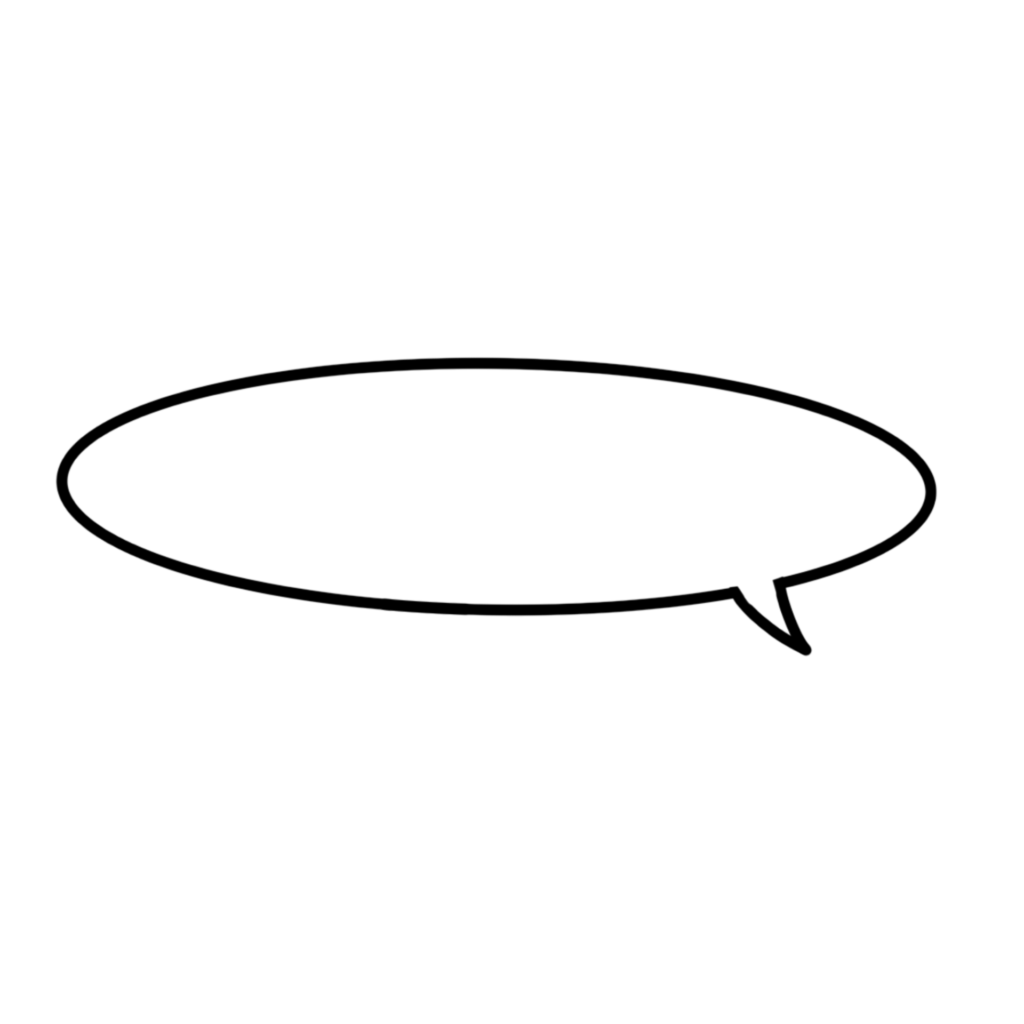
Prepare several speech bubbles with text already inserted.
(You can take this speech bubble home with you.)
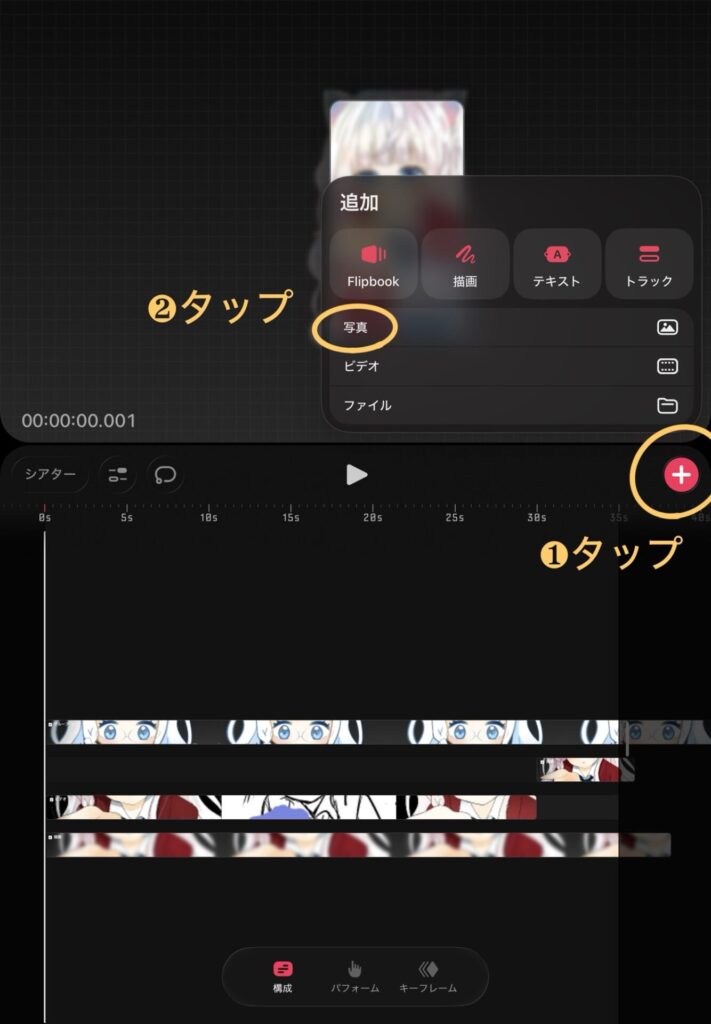
Tap in the order shown in the photo above.
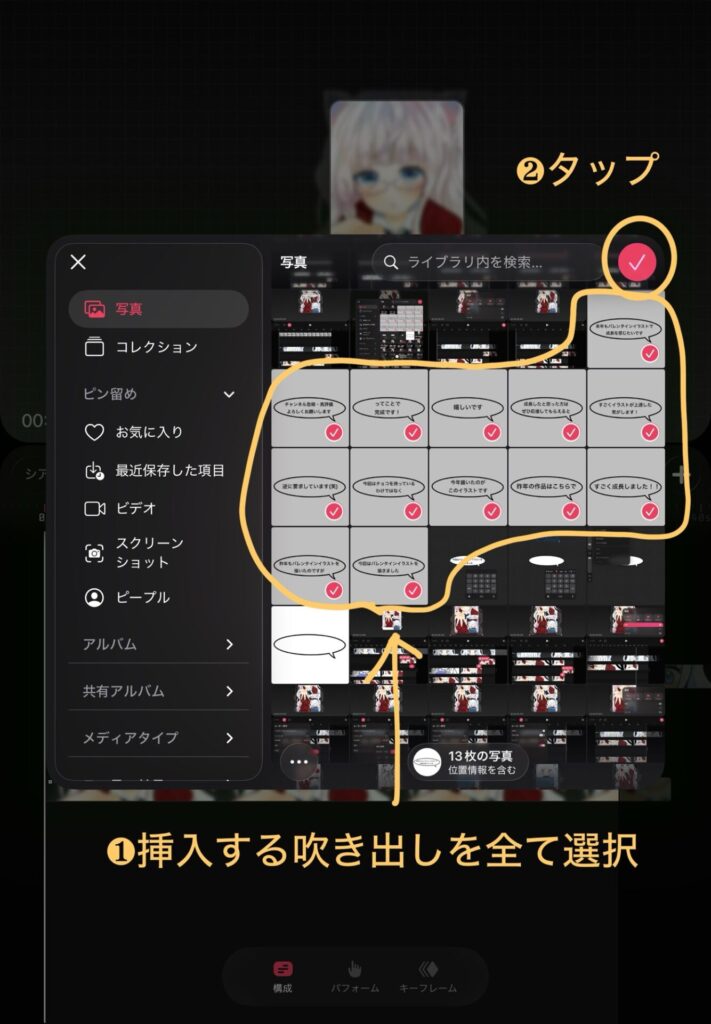
Select the callout you want to insert.
This time there are 13.
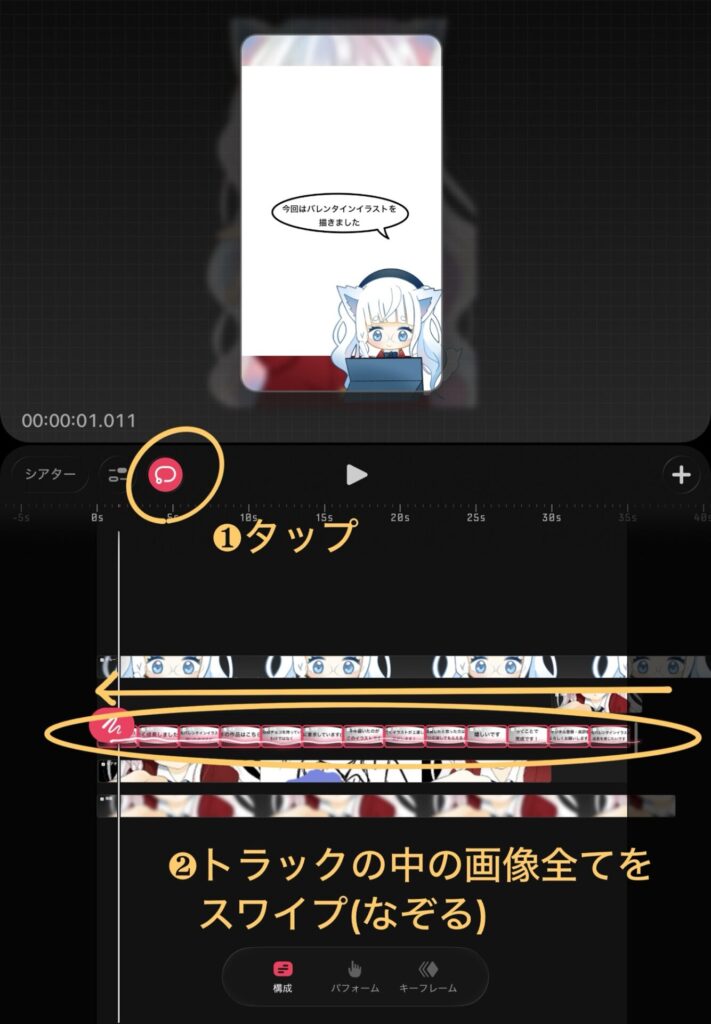
After selecting an image, it will appear as shown in the yellow oval.
If we leave them as they are, they'll all be scattered and won't be able to be moved, so we'll group them together.
Tap the location marked ❶, then trace the image you just added, as shown in ❷.
Then a pink line will appear, so trace it all the way from beginning to end.
If all of them have pink borders, it's a success.
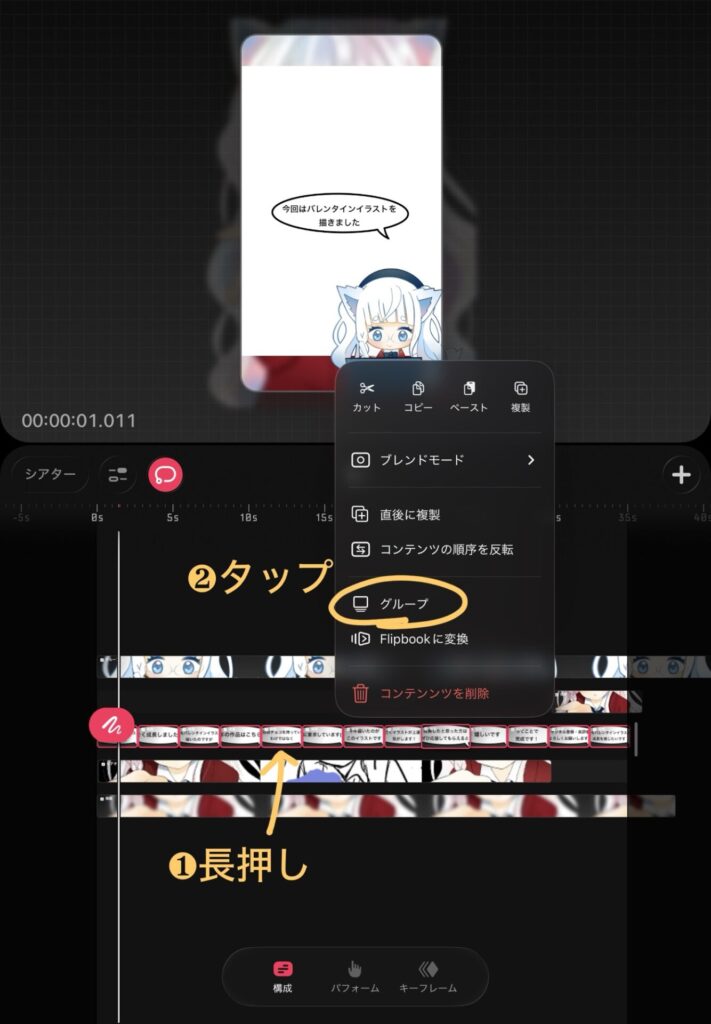
❶ Press and hold the track in the image, then tap "Group" in ❷.
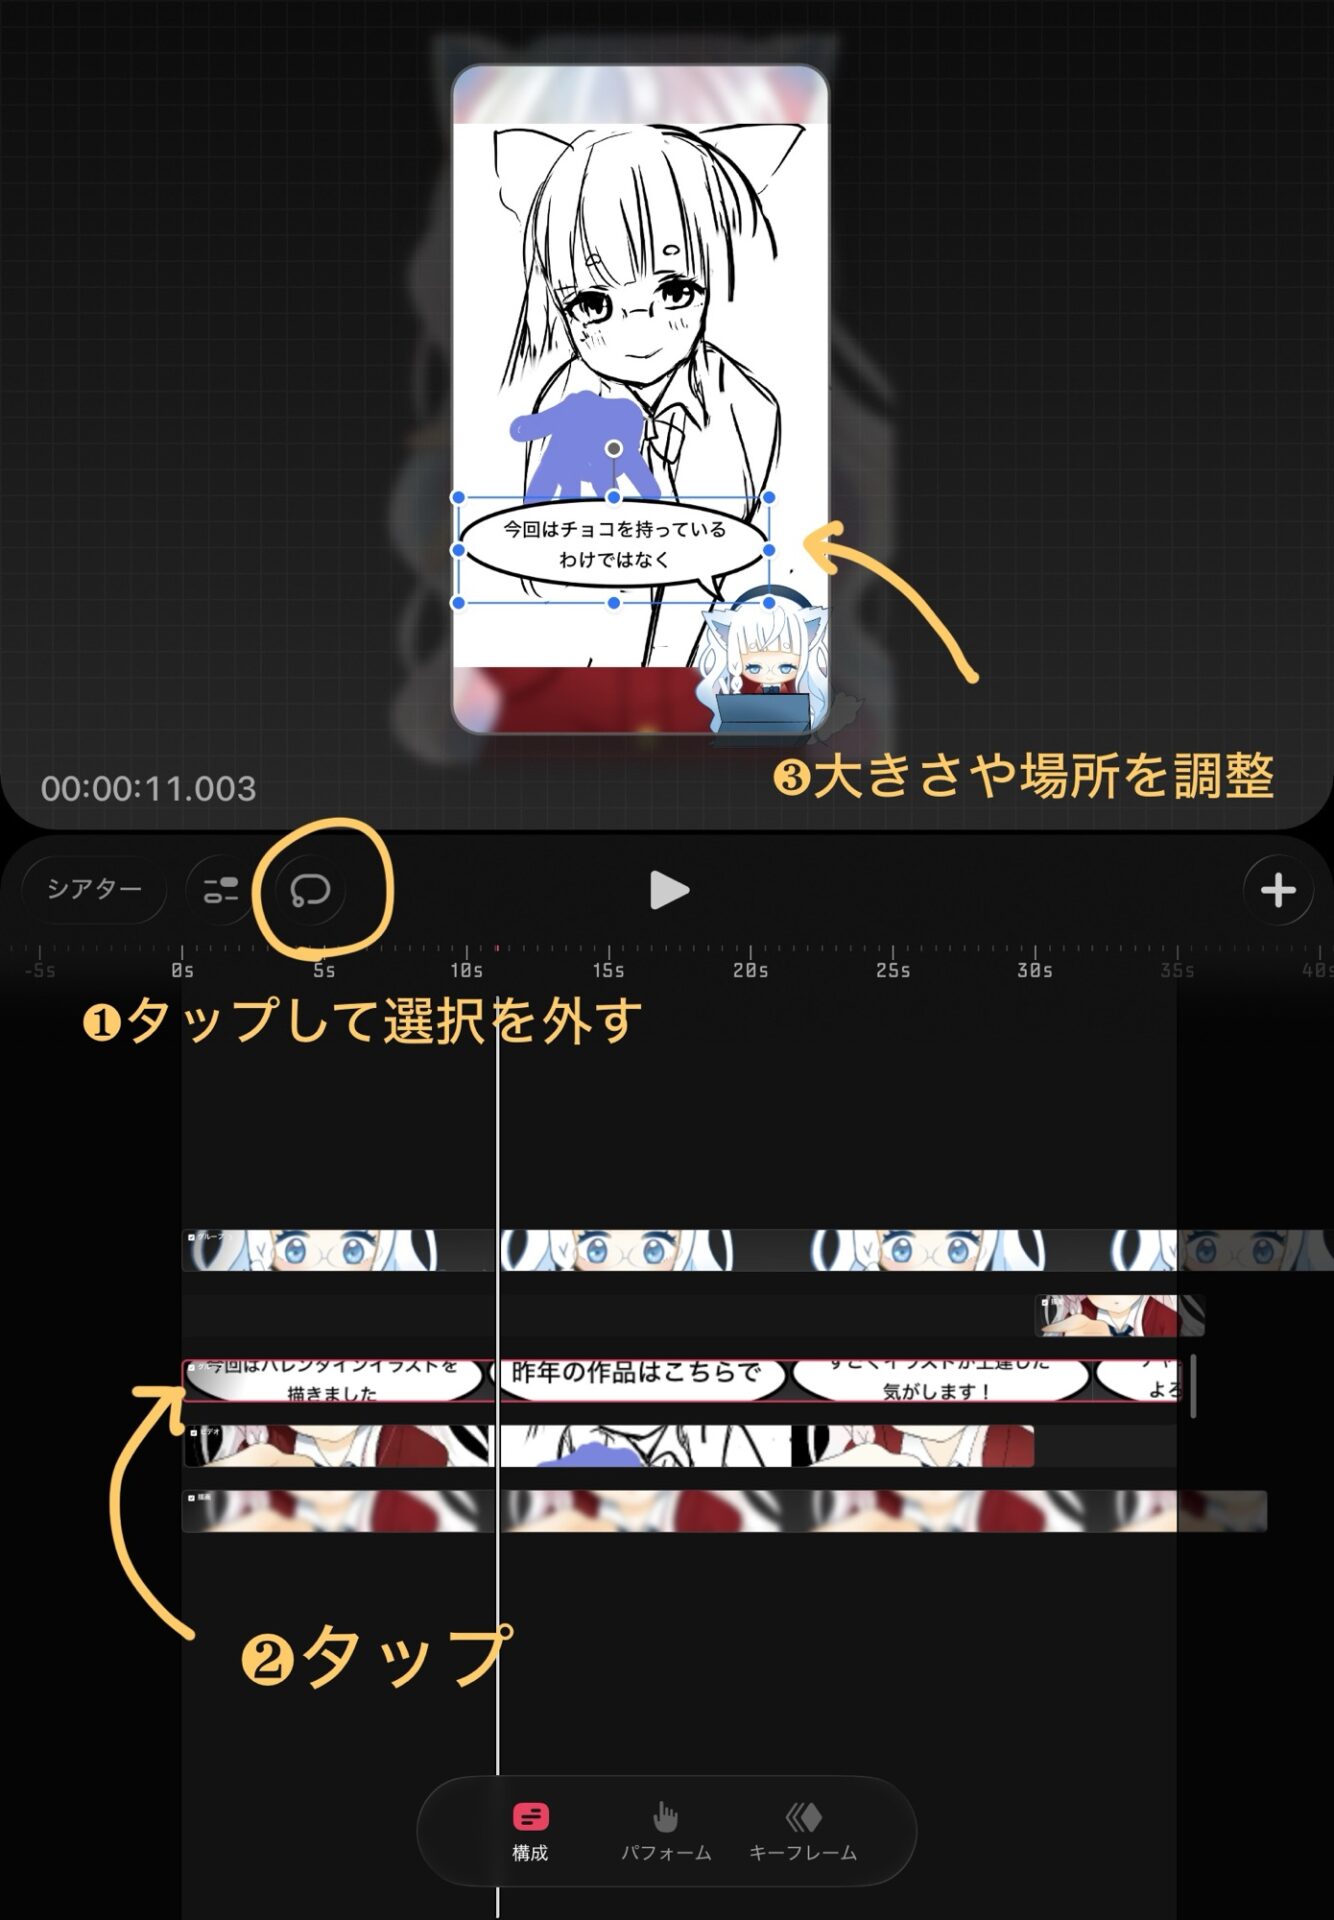
The grouping is now complete.
Tap in the order of ❶ and ❷ to adjust the size on the stage.
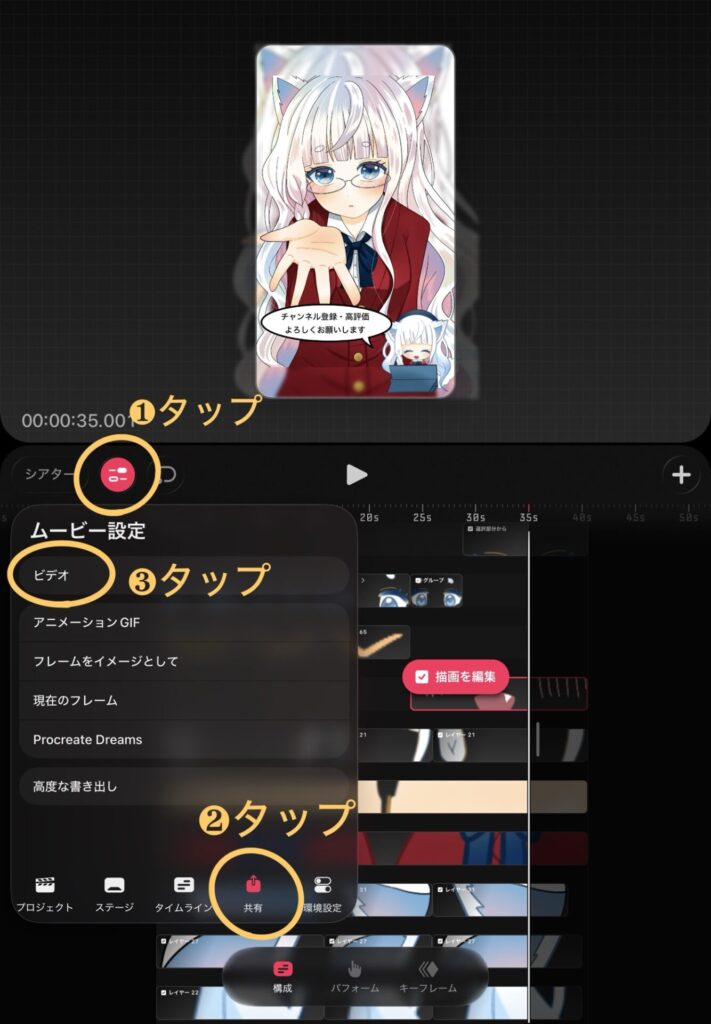
Tap the "▶" in the middle of the screen to check for any glitches or defects.
Once you've confirmed, tap in the order of ❶ to ❸.
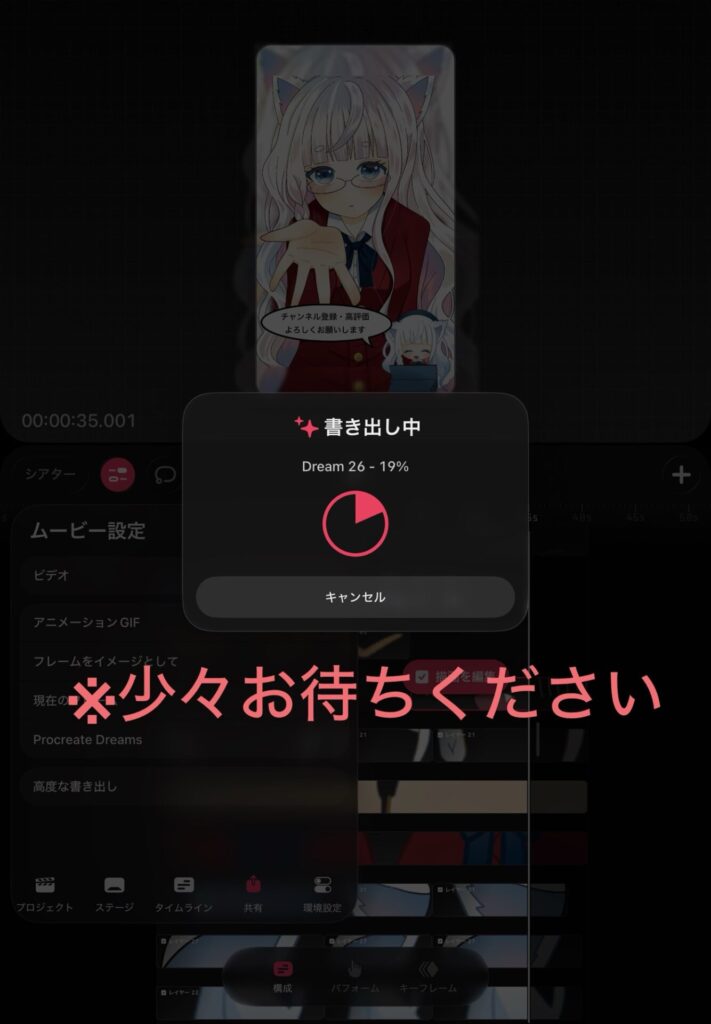
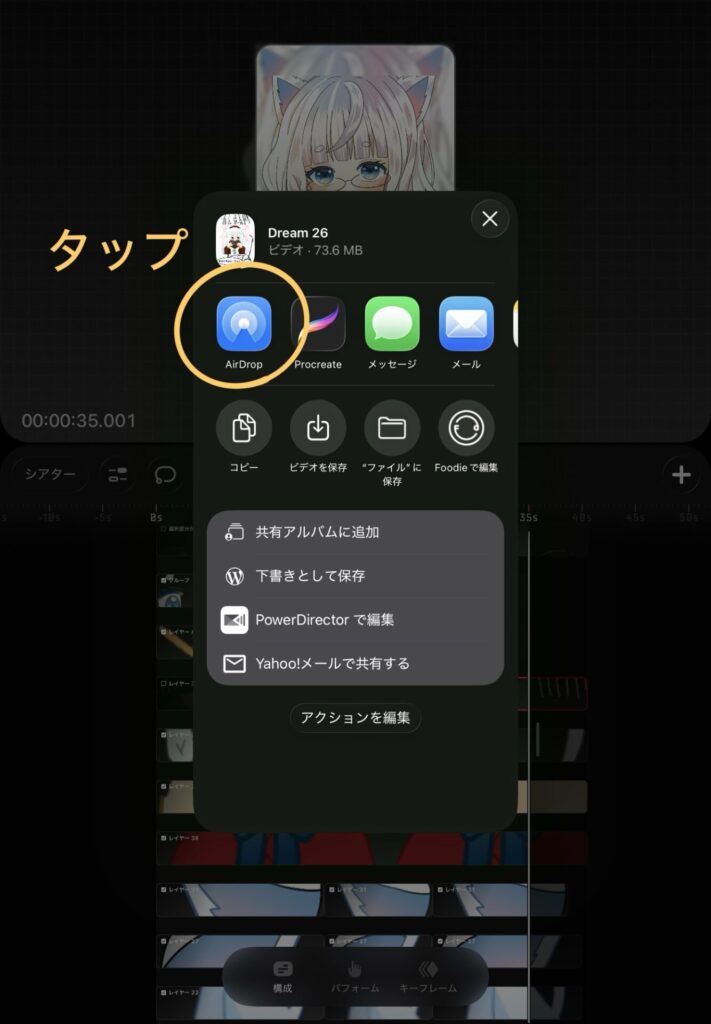
I upload videos to YouTube using my smartphone, so I save the videos to my smartphone.
From here on, the screen will be displayed on a smartphone.
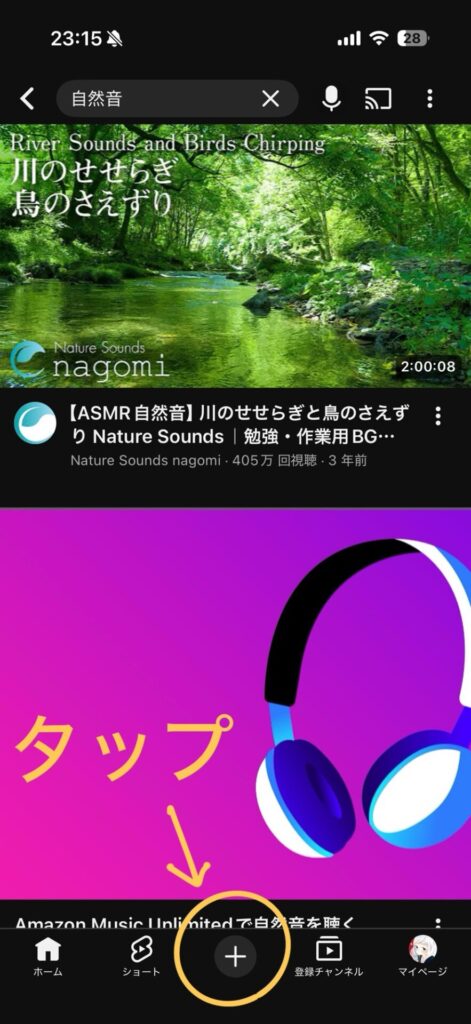
Open YouTube and tap the "+" at the bottom.
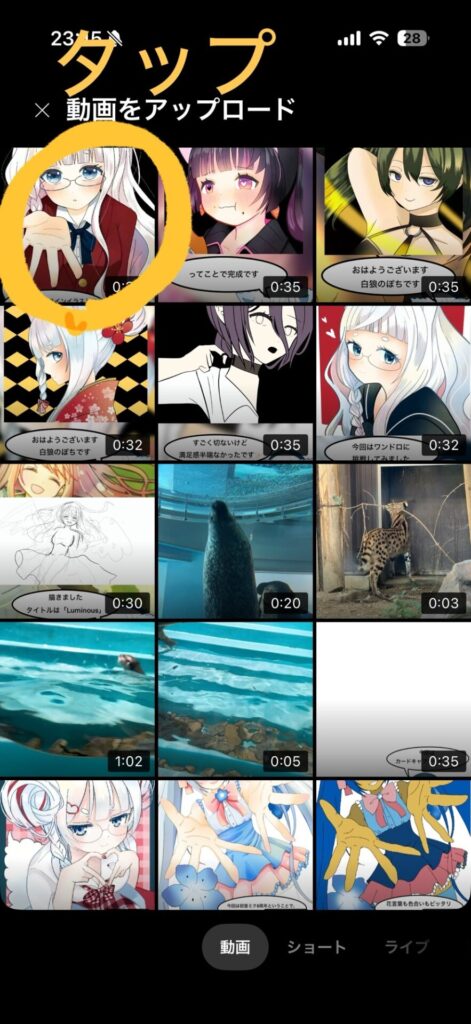
Select the video you want to upload.
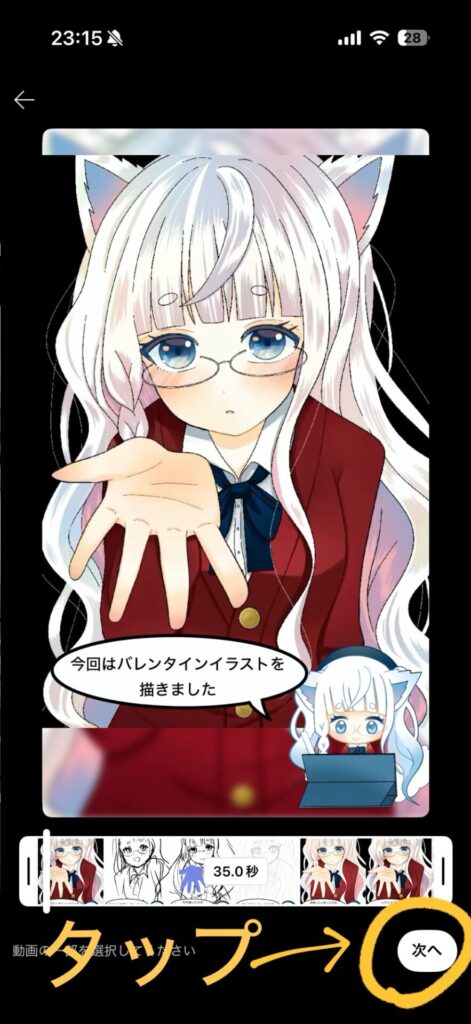
Tap Next.
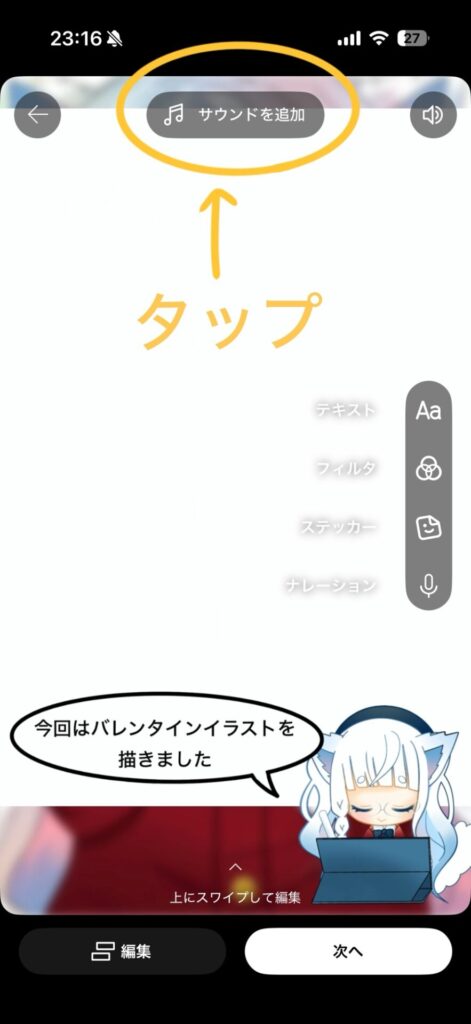
To add music, tap "Add Sound" at the top.
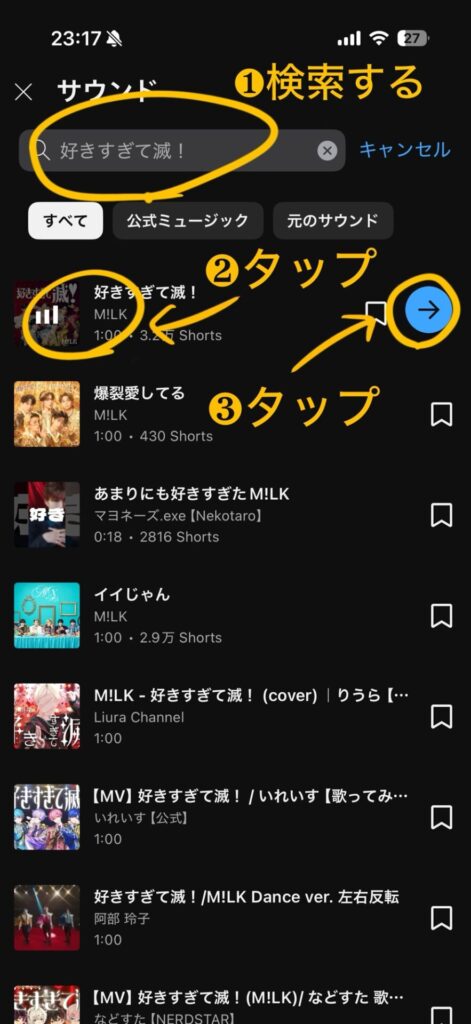
Choose the music you want to include in your video.
If it's not there, search for it and tap in the order of ❷, then ❸.
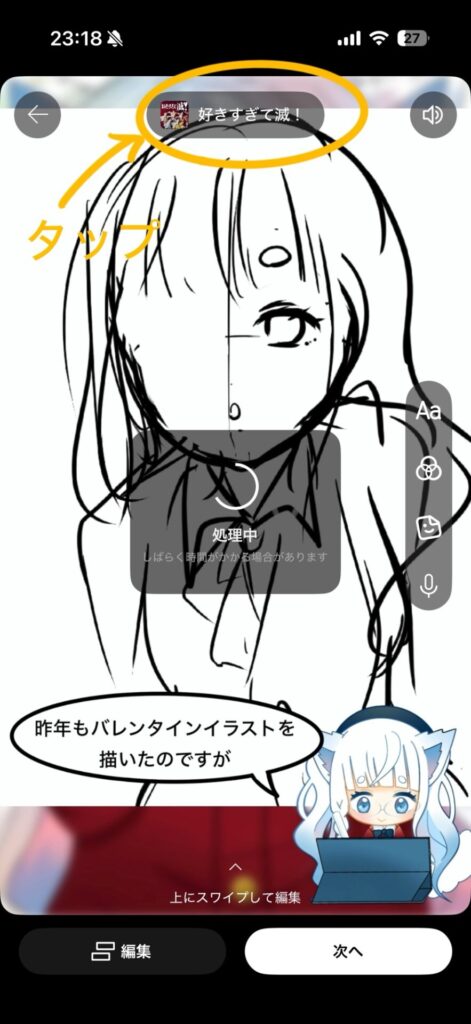
If the song is in the wrong place, tap the yellow circle.
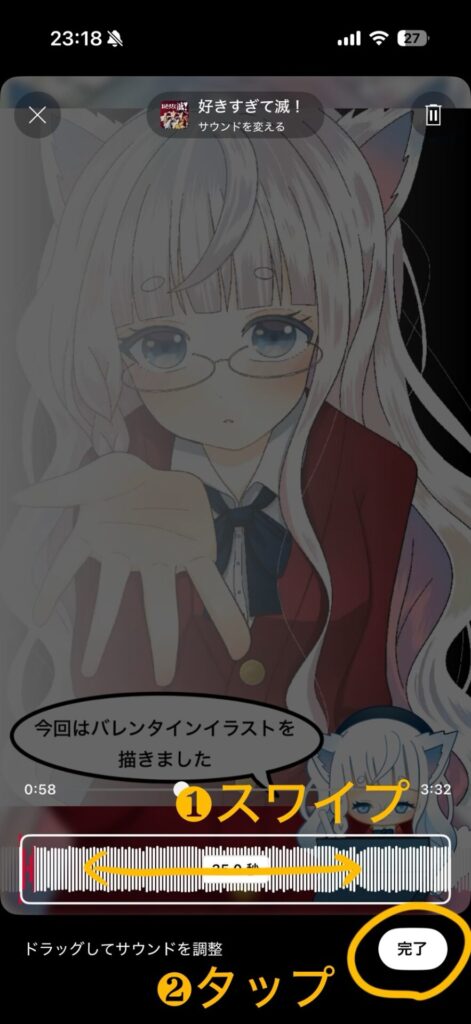
Then, you can change the song's position, so swipe it to your preferred location.
Tap the yellow circle to finish.
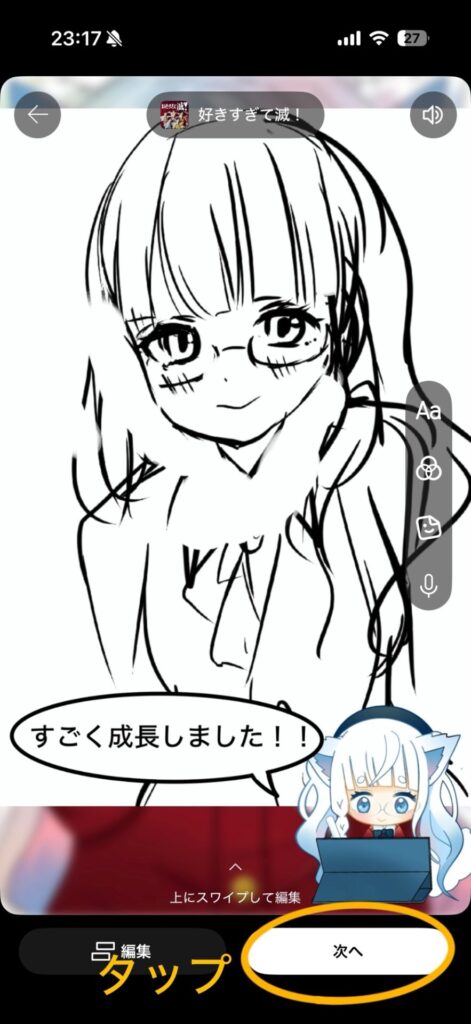
Once finished, tap "Next".
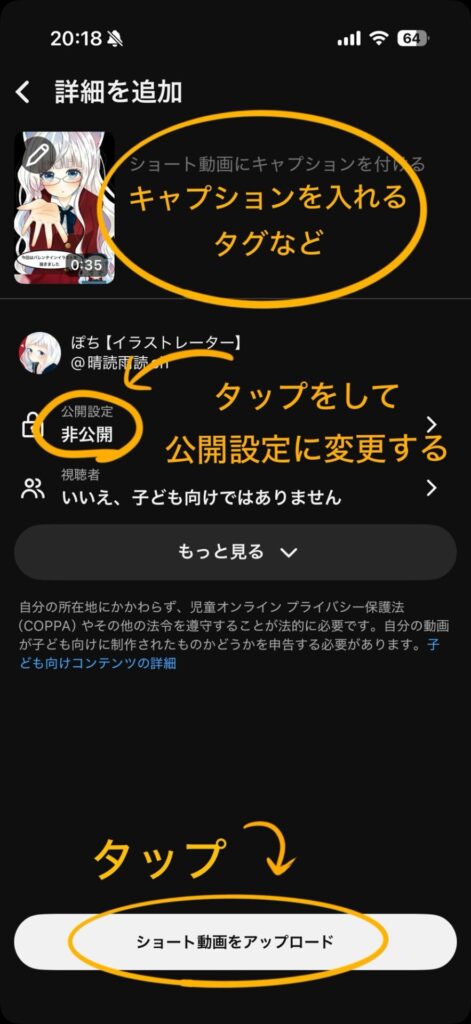
Enter the video caption and tags in the caption field and then set the publication settings.
Finally, tap "Upload Short Video" at the bottom.
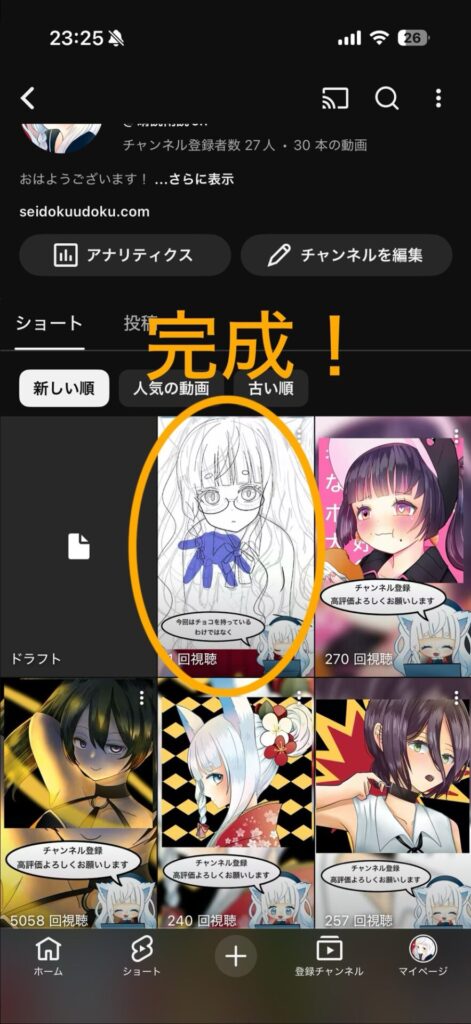
The process is complete once the video you just uploaded appears in the shorts list.
Great job everyone!
This is how it turned out.
Sunny Reading Rainy Reading Channel
Please subscribe to the channel and give us a like!
This time, I will explain what I am actually doing.Procreate and Procreate DreamsHow to create short videos usingThat concludes our introduction.
All you need is an iPad and two apps.
It might seem difficult, but if you follow the steps one by one, even beginners can enjoy creating videos.
Of course, what I've shown you here is just one example of my approach.
Feel free to arrange it however you like to suit your own style!
Why not make your short video debut with Procreate x Dreams starting today?
If anyone has created a piece of artwork using this blog as a reference, I would love to hear about it in the comments!
Thank you for reading to the end.
Okay then!
Create short videos easily with Procreate and Dreams! A beginner-friendly guide to making them.Create short videos easily with Procreate and Dreams! A beginner-friendly guide to making them.If you enjoyed this article or illustration even a little, your support would be greatly appreciated and very encouraging.